Archive for the ‘Windows 7’ category

How to Manually Clear or Set Dirty Bit on Windows Volume

September 17th, 2016 by Admin

When a dirty bit is set on a volume, Windows automatically performs a disk checking the next time the computer is restarted. You can run the chkntfs command at the Command Prompt to check if a volume is dirty, but there is no way to clear the dirty bit unless you let Windows go through disk scanning at boot.
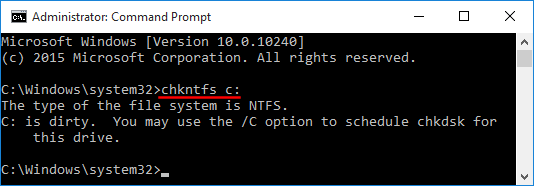
disk-dirty

In this tutorial we’ll show you how to manually clear or set the dirty bit for a NTFS & FAT32 volume in Windows 10, 8, 7, Vista and XP. The procedure requires you to use a disk editor software such as WinHex. If you want to edit the dirty bit for a system volume currently in use, you need to use a WinPE bootable CD to boot off your PC.

How to Manually Clear or Set Dirty Bit on Windows Volume?

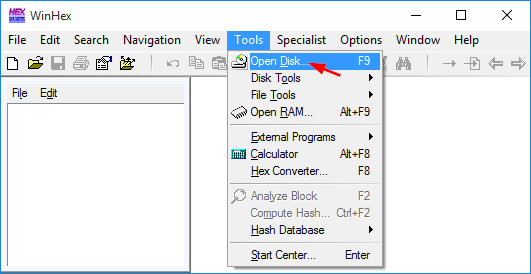
To get started, open WinHex as administrator rights. Click the Tools menu and select Open Disk.
open-disk-with-winhex

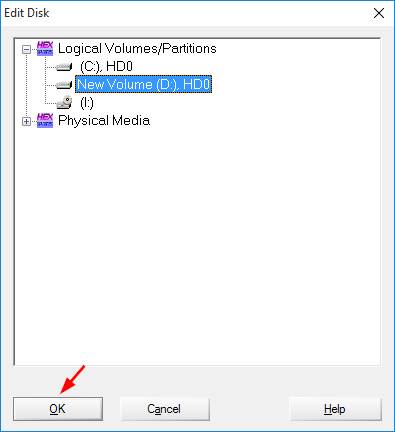
When prompted to select a drive for editing, choose the logical volume you want to edit the dirty bit on, and then click OK.
edit-logical-volume

For FAT32 Volume:

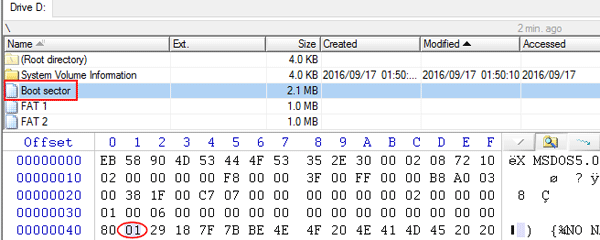
Click on “Boot sector” at the directory browser. The dirty bit for FAT32 volume is located at offset 0x41. If this volume is dirty, the bit should be 01. Just change 01 to 00 and then save your changes back to disk, now you’ve successfully cleared the dirty bit.
fat32-dirty-bit

For NTFS Volume:

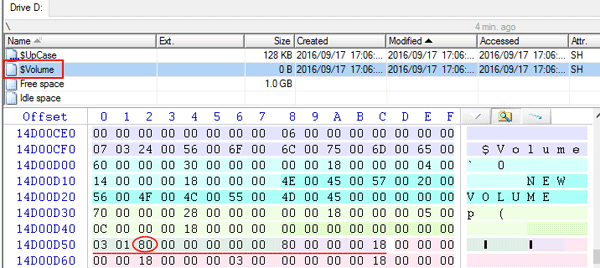
Click on $Volume at the directory browser. The offset location of the dirty bit is slightly different on every NTFS volume. To locate the dirty bit, look for a hex string of 13 bytes, beginning with 03 01, ending with 80 00 00 00 18. You should be able to find a match within the first or second sector.
ntfs-dirty-bit

The dirty bit is the 3th byte of the hex string that I’ve circled with red line. To set a dirty flag on the drive, just change it to 01. Or change it to 00 if you want to clear the dirty flag.

When it’s done, commit the change to the disk.
3 Ways to Run Disk Error Check in Windows 10, 8 and 7

September 17th, 2016 by Admin

All versions of Windows come with a useful disk checking feature which can check the integrity of your hard disk, fix file system errors and scan for bad sectors. In this tutorial we’ll show you 3 ways to run disk error check in Windows 10, 8 and 7.

Method 1: Run Disk Check from Windows Explorer

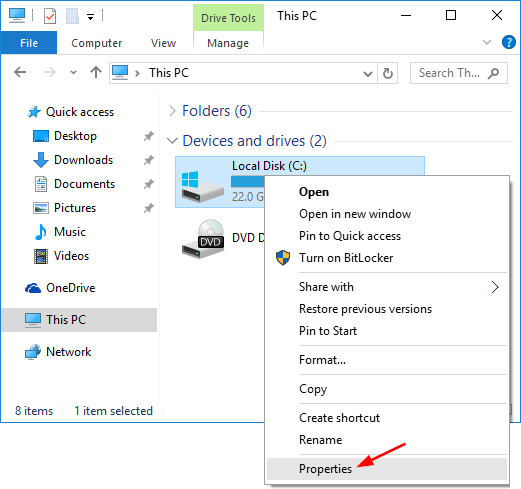
  1. Open Windows Explorer. Right-click on the drive you want to run the disk check on, and choose Properties.

    disk-properties

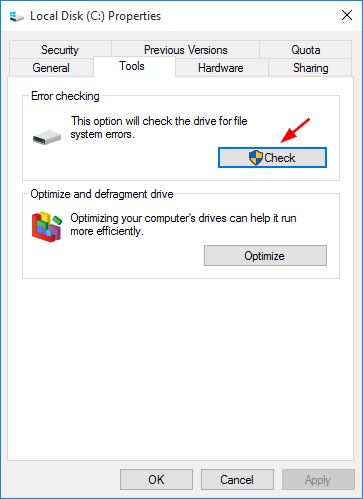
  2. Select the Tools tab. Under the “Error checking” section, click on the Check button.

    disk-error-checking

  3. Click on Scan drive button to run the disk check.

    scanning-disk

    If your selected drive is a system partition that is being used, Windows will let you schedule a disk check on the next restart.

Method 2: Run Disk Check Using the Chkdsk Command Line

  1. Open an elevated Command Prompt.

    • In Windows 10/8, simply press the Windows key + X and select “Command Prompt (Admin)“.
    • In Windows 7, click on Start, navigate to Accessories, right-click on Command Prompt and select Run as administrator.
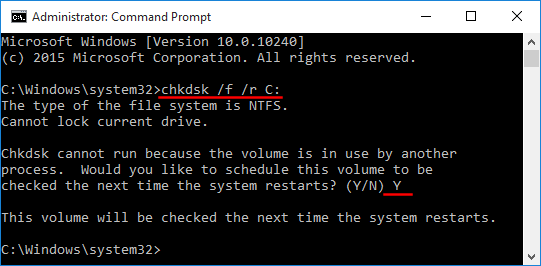
  2. You can run the chkdsk command to run the disk check. Replace C: with the letter of the drive you’d like to run a disk check.

    chkdsk /f /r C:

    chkdsk-cmd

    The /f flag tells windows to fix any issues and the /r flag tells it to do a deep scan. It locates bad sectors and recovers whatever information is readable.

Method 3: Run Disk Check By Setting The Dirty Bit

Sometimes if your PC is not properly shut down or crashed, a dirty flag is set on the disk to force disk check to be run at the next reboot. Here is a simple way to set a dirty bit for your drive manually:

  1. Open an elevated Command Prompt.
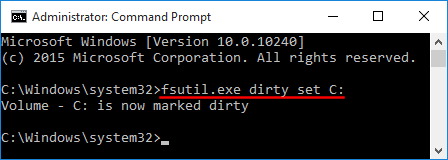
  2. Type the following command and press Enter. Replace C: with the letter of the drive you want to set as dirty.
    fsutil.exe dirty set C:

    mark-disk-dirty

  3. Reboot your computer and Windows will force a disk check on your specified drive.

How to Create System Restore Point in Windows 10 / 8 / 7

September 7th, 2016 by Admin

System Restore has been around since Windows 7. It’s very useful feature of Windows that helps you to restore your computer to previous working condition. If your computer gets messed up, corrupted or becomes unbootable, you can revert the operating system back to the recent restore point created. In this tutorial we’ll show you how to enable system restore and create a system restore point in Windows 10, 8 and 7.

How to Create System Restore Point in Windows 10 / 8 / 7?

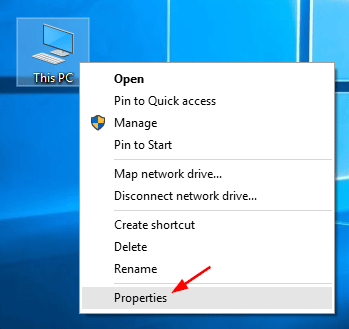
  1. Right-click on This PC (or My Computer) icon on your desktop and then select Properties from the context menu. For Windows 10, you might need to configure Windows 10 to display This PC icon on the desktop.

    right-click-this-pc

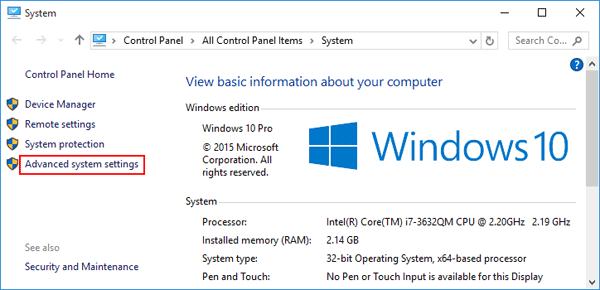
  2. Click the Advanced system settings link on the left side of the screen.

    advanced-system-settings

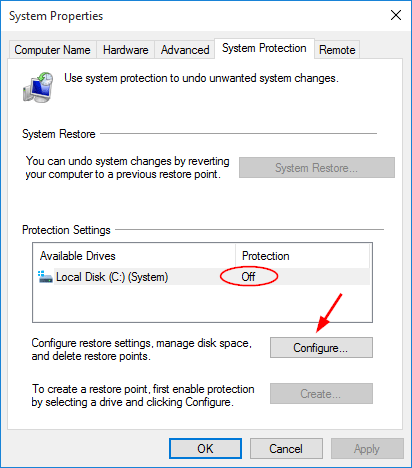
  3. Click System Protection tab. Make sure Protection is turned on for your system drive (most of the time it’s C:\ drive).

    configure-system-restore

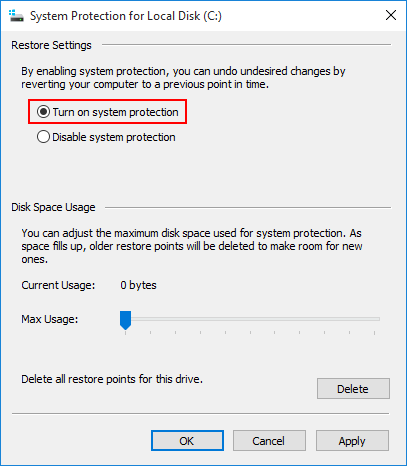
    If protection is turned off, select the system drive and click Configure, next select Turn on system protection option in the resulting dialog.

    turn-on-system-protection

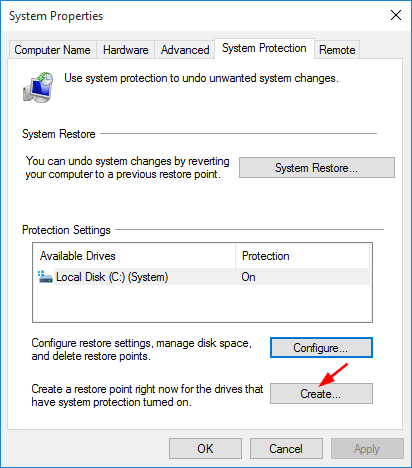
  4. To create a restore point manually, click on the Create button.

    create-restore-point

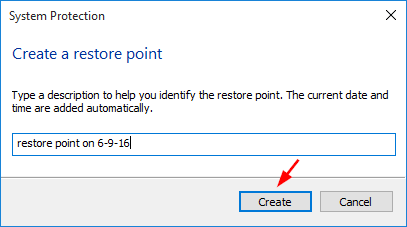
  5. Enter a name or description for your new restore point, and then click Create button again.

    name-restore-point

  6. Restore point creation are fast, it shouldn’t take longer than a few minutes.

    creating-restore-point

    Once the restore point is created, you will see the “Restore point was created successfully” message.

The above process is very simple to create a restore point in Windows 10, 8 and 7. Afterwards, you can use System Restore to restore Windows to your created restore point when your computer becomes damaged in future.

How to Turn Off Safe Mode without Logging into Windows

September 5th, 2016 by Admin

“I tried to restart my computer into Safe Mode using msconfig without thinking. Now I can’t log in because I couldn’t remember the Administrator password. How can I disable Safe Mode and start my PC normally?”

Stuck at Windows login screen but your computer keeps booting into Safe Mode? Is there a way to turn off Safe Mode without logging into Windows? If you could log into Windows, you can easily disable Safe Mode using Msconfig or Command Prompt. What to do if you forgot the Safe Mode administrator password? In this tutorial we’ll show you how to turn off Safe Mode by booting your PC with Windows installation disc.

How to Turn Off Safe Mode without Logging into Windows?

  1. Boot your computer from Windows installation disc and press any key when prompted. If your computer still boots into Safe Mode, you need to enter into BIOS and change the boot sequence to CD/DVD first.
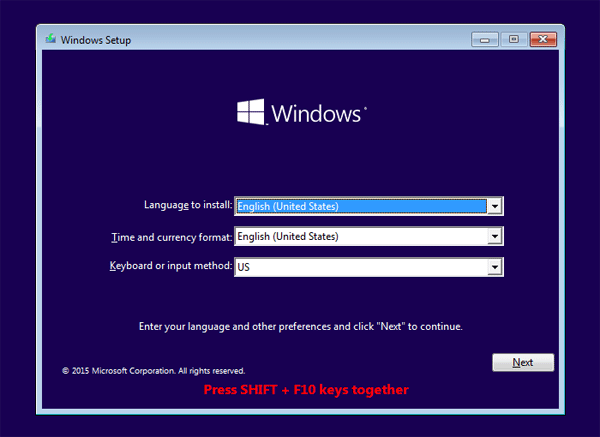
  2. When you see Windows Setup, press the Shift + F10 keys to open a Command Prompt.

    windows-setup

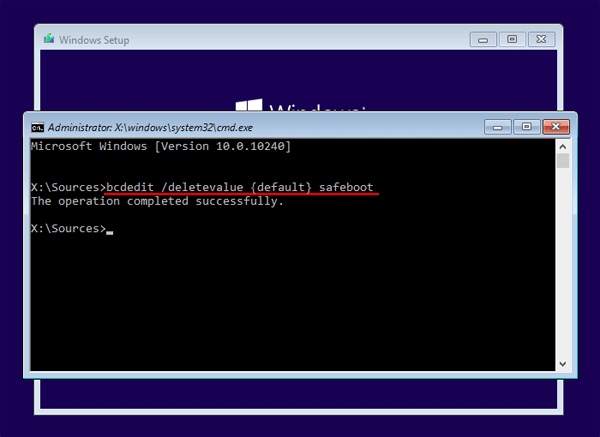
  3. Type the following command and press Enter to turn off Safe Mode:

    bcdedit /deletevalue {default} safeboot

    turn-off-secure-boot

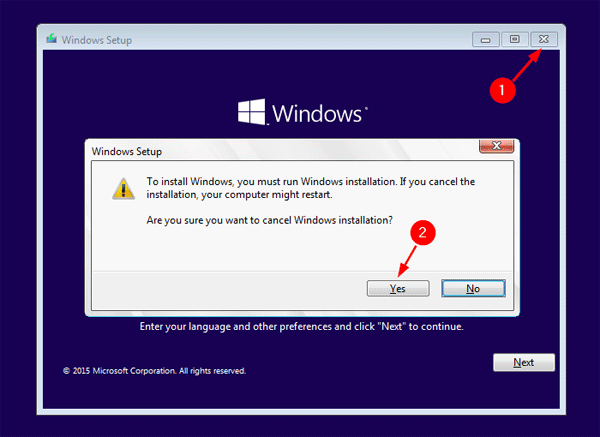
  4. When it’s done, close the Command Prompt and stop Windows Setup.

    cancel-windows-setup

    Reboot without installation disc, and your computer should boot in normal mode by default. This method works with Windows 10, 8.1, 8, 7 and Vista.

How to Edit Offline Windows Registry from WinPE

August 7th, 2016 by Admin

When your computer no longer boots up or you’re unable to login to Windows, a registry hack might fix your problem. To access the registry for an unbootable Windows installation, you should use a WinPE bootdisk. In this tutorial we’ll walk you through the steps to load / edit offline registry hive from WinPE.
Before get started, we need to know the locations of Windows registry hives:

HKEY_LOCAL_MACHINE\SYSTEM: %windir%\system32\config\SYSTEM
HKEY_LOCAL_MACHINE\SAM: %windir%\system32\config\SAM
HKEY_LOCAL_MACHINE\SECURITY: %windir%\system32\config\SECURITY
HKEY_LOCAL_MACHINE\SOFTWARE: %windir%\system32\config\SOFTWARE
HKEY_USERS\.DEFAULT: %windir%\system32\config\DEFAULT

How to Edit Offline Windows Registry from WinPE?

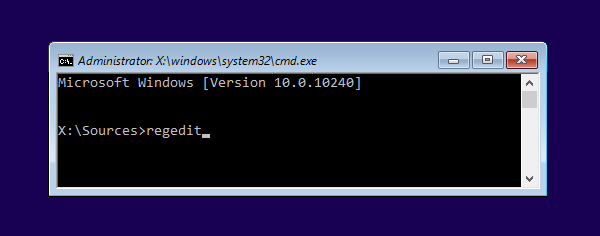
  1. Boot your computer into WinPE. Open a Command Prompt and run regedit.exe to open the Registry Editor.

    command-prompt-from-winpe

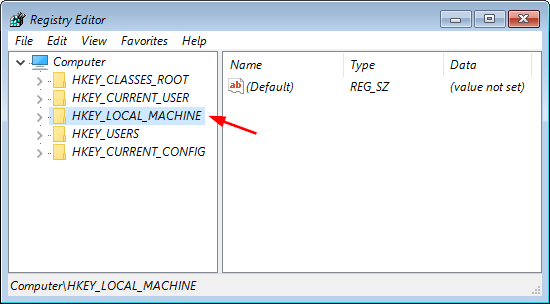
  2. In the left pane of Registry Editor, highlight the HKEY_LOCAL_MACHINE hive (or HKEY_USERS).

    highlight-registry-key

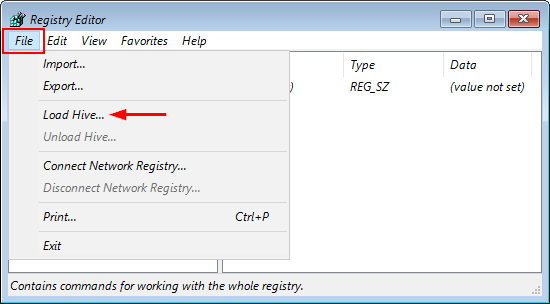
  3. Click the File menu and select Load Hive.

    load-hive

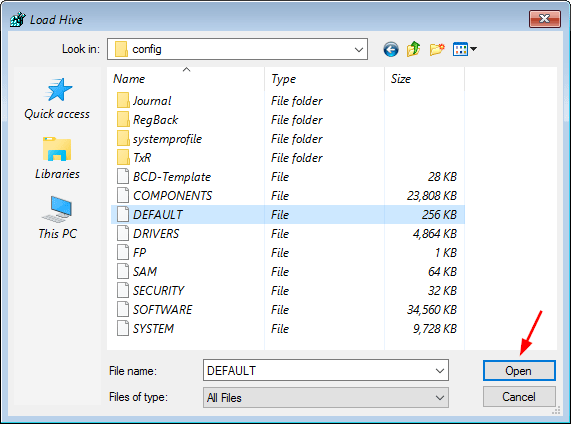
  4. Browse to your Windows partition and select the registry hive which you wish to load. In my example, the registry hives are located in the directory D:\Windows\System32\Config.

    select-registry-hive

  5. Type a key name whatever you like (e.g. “OfflineReg“) and click OK. The name will be used to create a new node in the tree so one can browser the offline registry.

    enter-key-name-for-loading

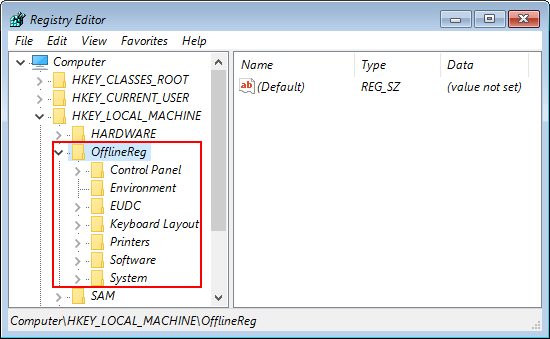
  6. Now under the HKEY_LOCAL_MACHINE key, you should see a new key named after the name you typed previously.

    offline-registry

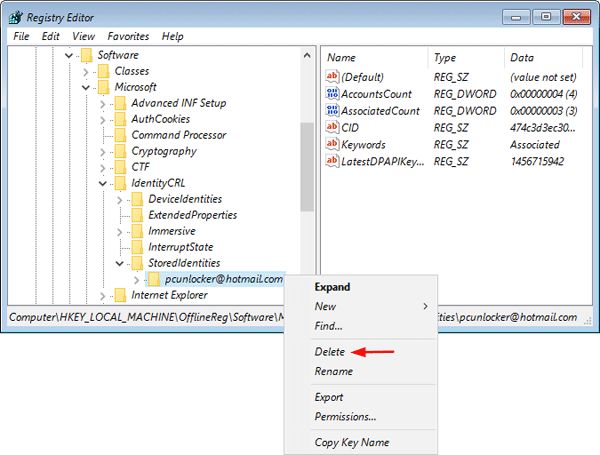
  7. Expand the new key, browse to the desired key or value for editing. In my example, I browse to OfflineReg\Software\Microsoft\IdentityCRL\StoredIdentities and delete its subkey.

    modify-offline-registry

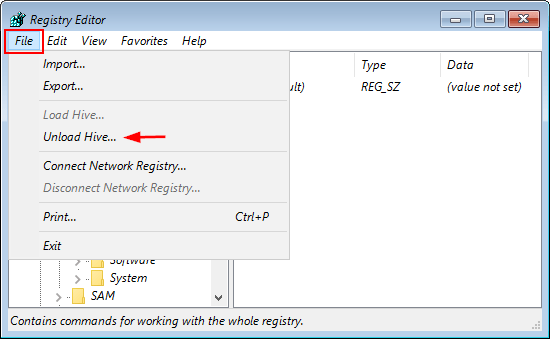
  8. When you finish with the modifications, highlight the key you created previously (e.g. “OfflineReg“). Click the File menu and select Unload Hive.

    unload-hive

  9. This will unload the hive and all changes made will be saved to the offline registry.

3 Ways to Disable Windows Key Shortcuts (Hotkeys) in Windows 10

July 28th, 2016 by Admin

Did you ever play a game in full-screen mode and accidentally press the Windows key? This might cause your game to minimize or exit full-screen mode. What to do if the Windows keyboard shortcuts conflict with some software shortcuts? In this tutorial we’ll show you 3 simple ways to disable Windows key shortcuts (hotkeys) in Windows 10.

After testing, the first two methods seem to disable only these keyboard shortcuts: Windows + D, Windows + R, Windows + S, Windows + A. It won’t disable the shortcuts like Windows + X, Windows + L, Windows + PrntScr or Windows + Tab in Windows 10. If you want to disable the single Windows key on your keyboard, the 3th method is your choice.

Method 1: Disable WIN+ Keyboard Shortcuts in Using Group Policy

  1. Type edit group policy in the Search or Run box and press Enter. It will open Local Group Policy Editor.
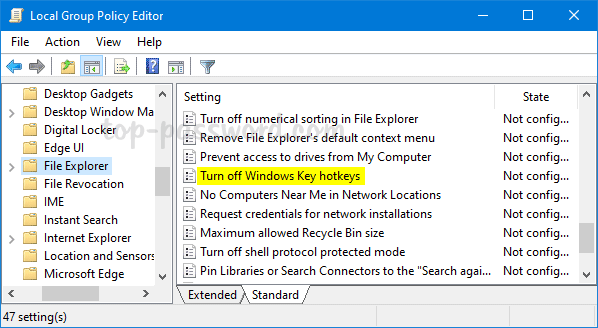
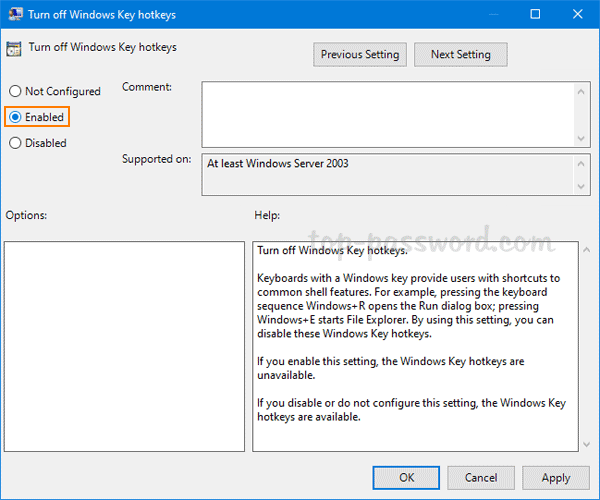
  2. Navigate to User Configuration -> Administrative Templates -> Windows Components -> File Explorer. In the right-side pane, double-click on the Turn off Windows Key hotkeys policy to edit it.

  3. Select the Enabled option and click Apply and then OK.

  4. Reboot the computer to apply the changes.

Method 2: Disable WIN+ Keyboard Shortcuts in Using Registry Editor

If you’re unable to access the Local Group Policy Editor, you can take help of Registry Editor for the same task. Just follow these steps:
  1. Type regedit in the Search or Run box and press Enter. It will open Registry Editor.
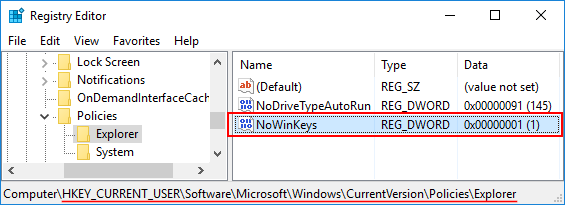
  2. Navigate to the following key: HKEY_CURRENT_USER\Software\Microsoft\Windows\CurrentVersion\Policies\Explorer. In right-side pane, right-click on the empty space and select New -> DWORD (32-bit) Value.
  3. Rename the newly created entry as NoWinKeys and set its value to 1.

    NoWinkeys

  4. Close Registry Editor and restart your system. After reboot the WIN+ hotkeys will be turned off in your system. If you want to re-enable the WIN+ keyboard shortcuts, just delete NoWinKeys entry.

Method 3: Disable Windows Key Completely

This method allows you to completely disable the Windows logo key for all users in Windows 10, 8, 8.1 and Windows 7. Follow these steps to disable Windows key virtually:

  1. Type regedit in the Search or Run box and press Enter. It will open Registry Editor.
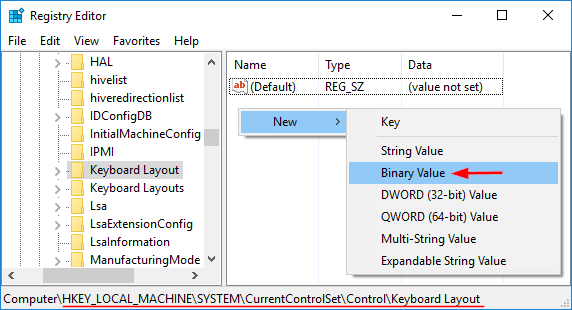
  2. Navigate to HKEY_LOCAL_ MACHINE\System\CurrentControlSet\Control\Keyboard Layout. In the right-side pane, right-click on the empty space and select New -> Binary Value.

    new-binary-value

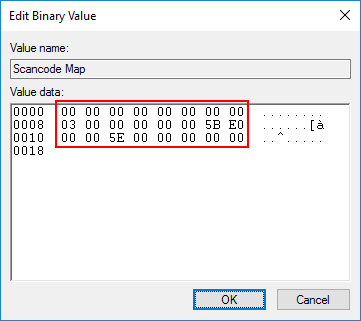
  3. Rename the newly created entry as Scancode Map. Right-click on Scancode Map and click Modify. Type in the following value as the value data manually (copying and pasting will not work), then click OK.

    00 00 00 00 00 00 00 00
    03 00 00 00 00 00 5B E0
    00 00 5C E0 00 00 00 00

    disable-windows-key

  4. Close Registry Editor and restart the computer. When you boot back into Windows 10, press the Windows key and nothing will happen. If you want to re-enable the Windows logo key, open the Registry Editor again and delete the Scancode Map entry.

How to Fix “Task Manager is Disabled or Greyed out” in Windows 10

July 27th, 2016 by Admin

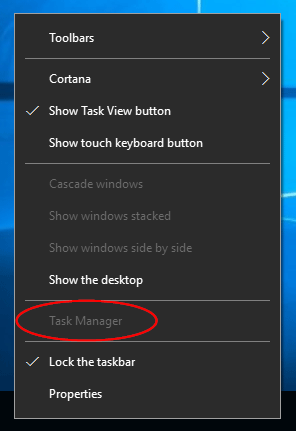
Unable to access Task Manager by pressing Ctrl+Shift+Esc? When you right-click on the taskbar, you might find that “Task Manager” option has been grayed out:

task-manager-greyed-out

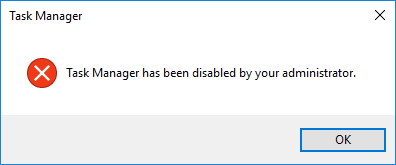
Also when you press the Windows key + R and type taskmgr, you’ll receive the following error message:

“Task Manager has been disabled by your administrator.”

task-manager-disabled

Task Manager is probably disabled by an administrator or a virus or spyware. In this tutorial we’ll show you how to fix “Task Manager is disabled or greyed out” in Windows 10, by using Group Policy, Registry Editor or Command Prompt. Either way, you need to log in as administrator before following the steps.

Method 1: Fix ‘Unable To Access Task Manager’ Using Group Policy

  1. Press Win+R to open Run box, and type gpedit.msc command to start the Local Group Policy Editor.
  2. Navigate down to the following:
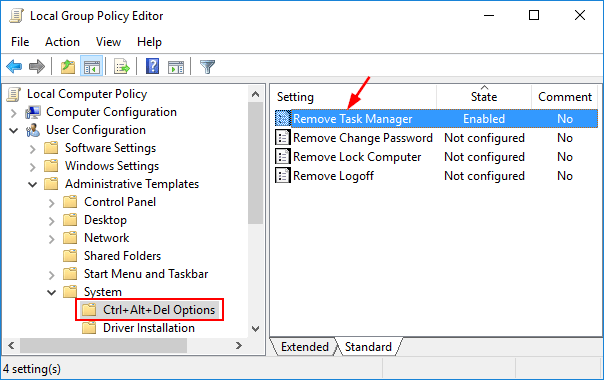
    User Configuration -> Administrative Templates -> System -> Ctrl+Alt+Delete Options
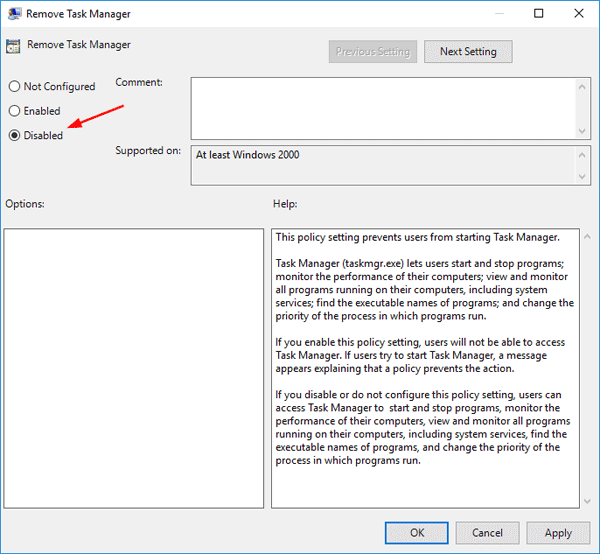
  3. Since you’re facing the issue that Task Manager has been disabled by administrator, you’ll see that the “Remove Task Manager” policy in the right pane is enabled. Double-click on it to modify.

    remove-task-manager

  4. To enable Task Manager, you should set this policy to Not Configured or Disabled.

    fix-disabled-task-manager

    Click Apply followed by OK. Reboot and your problem should be fixed now!

Method 2: Fix ‘Unable To Access Task Manager’ Using Registry Editor

  1. Press Win+R to open Run box, and type regedit command to start the Registry Editor.
  2. Navigate to the following keys:
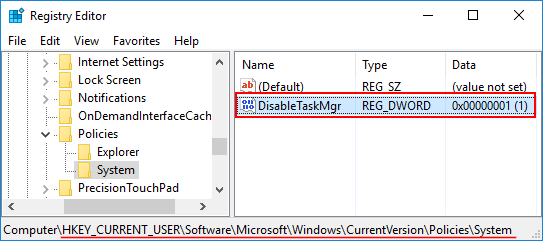
    HKEY_CURRENT_USER\Software\Microsoft\Windows\CurrentVersion\Policies\System

    DisableTaskMgr

  3. In the right side panel, you’ll see a 32-bit DWORD value named DisableTaskMgr. In order to re-enable Task Manager, double-click and change the value to 0. (If you want to disable Task Manager, just change its value data back to 1.)
  4. Go ahead and reboot your computer for the changes to take effect.

Method 3: Fix ‘Unable To Access Task Manager’ Using Command Prompt

  1. Press Win+X shortcut keys on the keyboard and select “Command Prompt (Admin)” from the Power User Menu.
  2. At the Command Prompt, type the following command and press Enter. This will enable the Task Manager.
    REG add HKCU\Software\Microsoft\Windows\CurrentVersion\Policies\System /v DisableTaskMgr /t REG_DWORD /d 0 /f

    enable-task-manager-via-cmd

    If you want to disable Task Manager again, just run this command instead:
    REG add HKCU\Software\Microsoft\Windows\CurrentVersion\Policies\System /v DisableTaskMgr /t REG_DWORD /d 1 /f

Note: If you receive the “access denied” error, it’s likely that you’re running Command Prompt in non-Administrator mode.

Automatically Sync Windows Time More Often Than Default

July 1st, 2016 by Admin

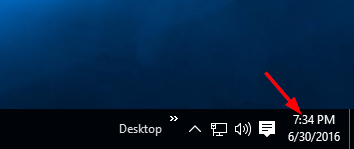
How often does Windows sync time? Is there a way to set a frequent period for Windows to sync time automatically? By default, domain controller will sync clock once per one hour, and standalone computer will sync clock once every week. In this tutorial we’ll show you how to change the time synchronization interval/frequency and make Windows automatically sync time more often than default.
windows-time

How to Make Windows sync time more often than default?

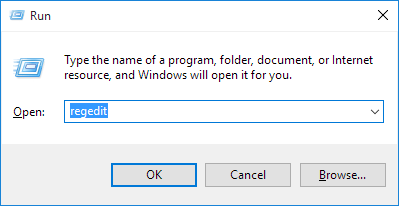
  1. To change the time synchronization interval, we have to access the Registry Editor. Press the Windows key + R to open the Run box. Type regedit and press Enter.

    regedit

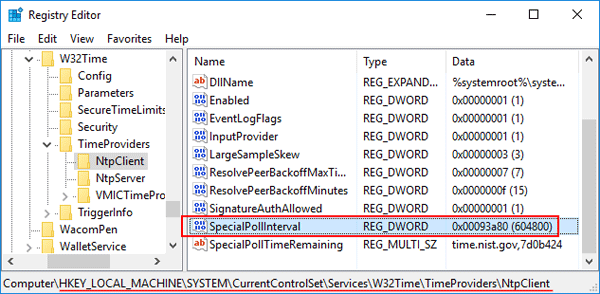
  2. Once the Registry Editor opens, navigate to the following registry key:
    HKEY_LOCAL_MACHINE\SYSTEM\ControlSet\Services\W32Time\TimeProviders\NtpClient
  3. Look for the SpecialPollInterval entry in the right pane. This entry specifies the interval in seconds for the Windows Time service to sync the time. The default value on standalone computer is 604800 seconds, that is equal to 7 days.

    SpecialPollInterval

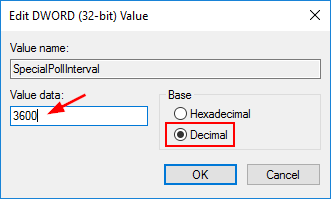
  4. Double-click on the SpecialPollInterval entry. From the pop-up dialog, click Decimal and enter the time interval (in seconds). For example, if you want to let Windows sync time each hour, just type 36000. Click OK and close Registry Editor.

    change-time-syn-interval

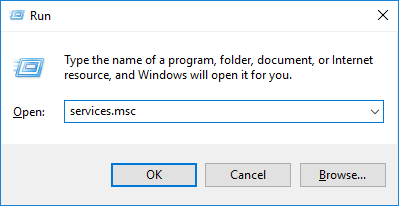
  5. Now we need to check if the Windows Time service is configured to start during boot. Press the Windows key + R to open the Run box. Type services.msc and press Enter.

    run-services

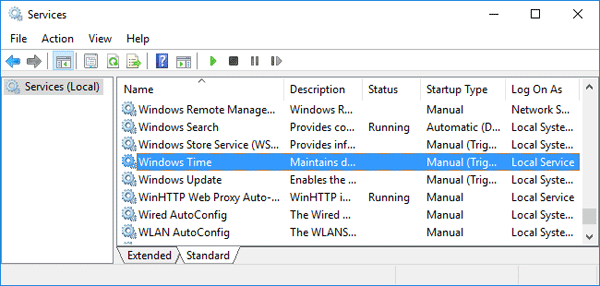
  6. From the service list, find the service named Windows Time and then double-click on it.

    windows-time-service

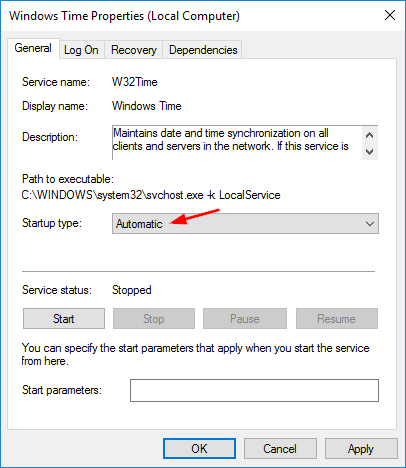
  7. Change the Startup type to Automatic and click OK.

    W32Time

    Reboot your computer and Windows will automatically sync the time at the interval you specified. Every time Windows loads up or you start or restart the Windows Time service, it will also sync time immediately.
    That’s all there is to it.