Archive for the ‘Tips & Tricks’ category

Easy Ways to Turn on ‘Do Not Disturb’ on Windows 11

April 27th, 2025 by Admin

‘Do Not Disturb’ is an useful feature in Windows 11, which can silence notifications from apps, system updates or alerts, so you can stay focused during a meeting or game without distractions. In this tutorial we’ll show you the most common ways to turn on ‘Do Not Disturb’ in Windows 11.

Method 1: Use System Tray to Turn on ‘Do Not Disturb’

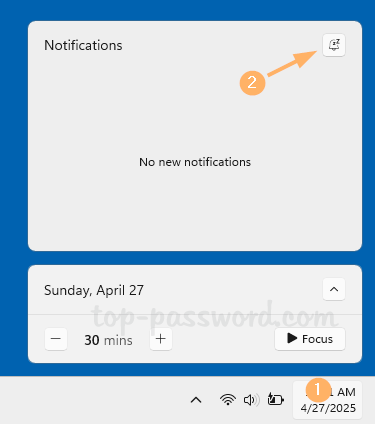
  1. Click on time and date in the system tray on the far right corner. When the notification center pops up, click the bell icon in the top-right corner.
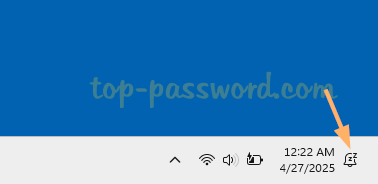
  2. It will enable the ‘Do Not Disturb’ mode immediately and you’ll see the bell icon on the right side of the taskbar. If there is no bell icon, Do Not Disturb is currently turned off.
Method 2: Use Settings App to Turn on ‘Do Not Disturb’

  1. Press the Windows key + I keyboard shortcut to open the Settings app. Choose System in the left sidebar and click Notifications on the right.

  2. You can either turn on ‘Do Not Disturb’ by flipping the “Do not disturb” setting to the On position,
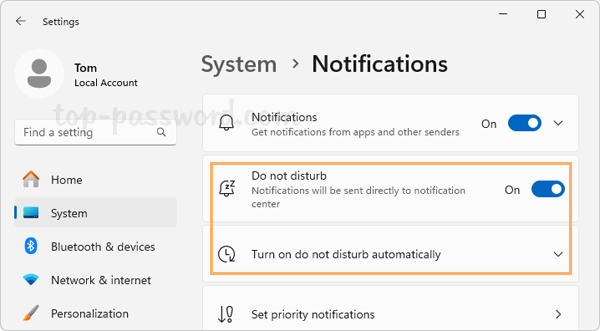
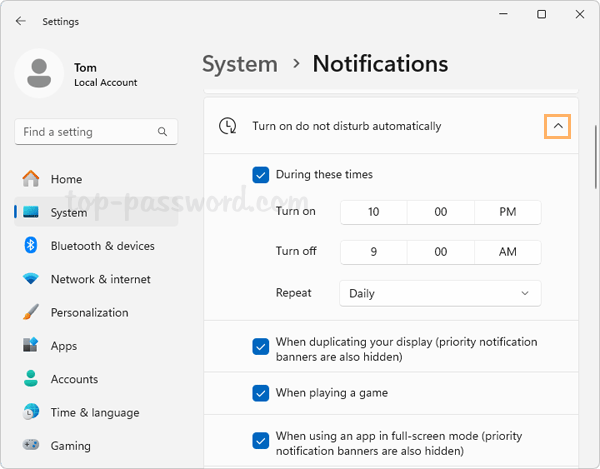
    or click the “Turn on do not disturb automatically” to expand its settings. From there you can schedule quiet hours, or tick the box “When playing a game” or others to configure when the ‘Do Not Disturb’ should be activated automatically.
Conclusion

The above methods allows you to turn on ‘Do Not Disturb’ easily on your Windows 11 computer. In addition, you can also turn on “Do not disturb” by starting a Focus session.
Fix: Unable to remove the Virtual Touchpad icon in Windows 11

April 19th, 2025 by Admin

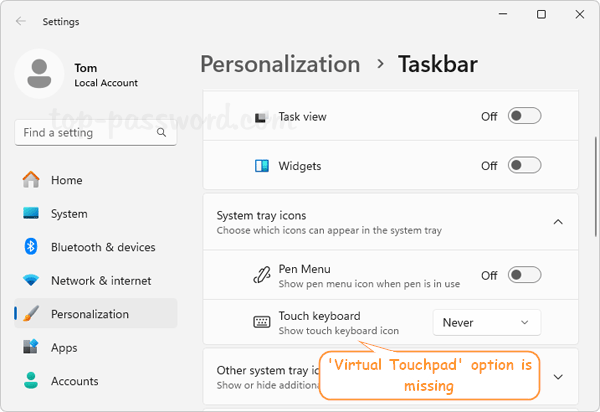
How do I remove the virtual touchpad icon from the system tray? The “Virtual Touchpad” option is missing from the Settings app?

Usually we can turn virtual touchpad on or off via opening the Settings app and browsing to Personalization -> Taskbar. However, sometimes you might find the “Virtual Touchpad” option is not there, and so you’re unable to remove it from system tray.

In this tutorial we’ll show you an easy fix to restore the missing “Virtual Touchpad” option in Settings on Windows 11, so you can then remove Virtual Touchpad icon from the taskbar.

How to Fix: Unable to remove the Virtual Touchpad icon in Windows 11

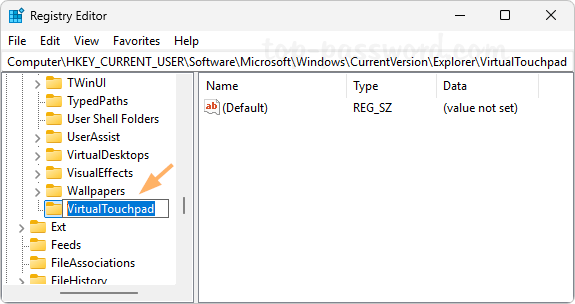
  1. Open Registry Editor and navigate to: HKEY_CURRENT_USER\Software\Microsoft\Windows\CurrentVersion\Explorer. Right-click the Explorer key on the left-side panel, and choose New -> Key.

  2. Name the new key VirtualTouchpad, and select it.

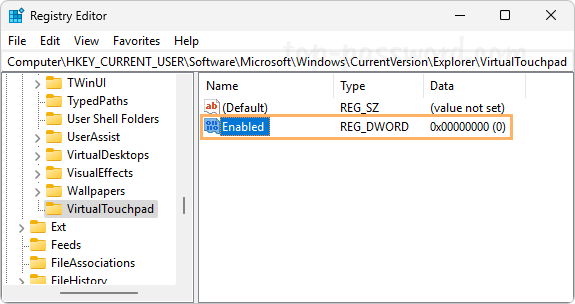
  3. Next, go to the right-hand panel. Right-click the blank area and select New -> DWORD (32-bit) Value.

  4. Name the DWORD entry Enabled, and leave the value data as 0.

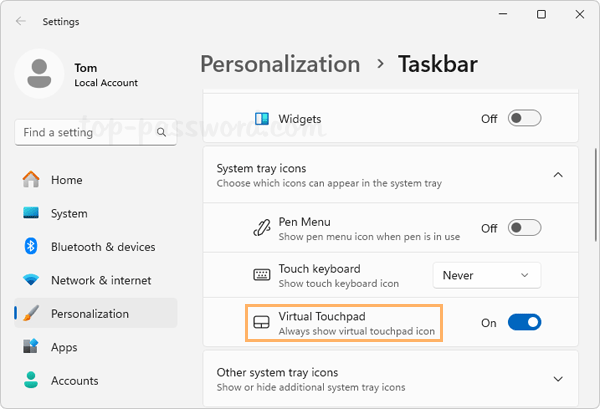
  5. Close Registry Editor and reboot your PC. The next time you open the Settings app and go to: Personalization -> Taskbar, the “Virtual Touchpad” option will show up under the “System tray icons” section, and you can toggle it Off to remove the Virtual Touchpad icon from the taskbar.

That’s it!

Fix: Remote Desktop Frequently Disconnects after Windows 11 Update

March 26th, 2025 by Admin

Remote desktop sessions keep disconnecting after a while? Recently I ran into this issue on Windows 11 24H2 and the remote desktop connection frequently disconnected so I had to reconnect again and again. This is quite frustrating and many people who experienced the same problem reported that either KB5050094 or KB5051987 was to blame. Uninstalling those updates might solve the issue but eventually I found a better solution. In this tutorial we’ll show you how to tweak the group policy to fix the issue of remote desktop connection frequently disconnecting after Windows 11 update.
How to Fix: Remote Desktop Frequently Disconnects after Windows 11 Update

  1. Press the Windows key + R together to open the Run box, type gpedit.msc and hit Enter to launch the Local Group Policy Editor.

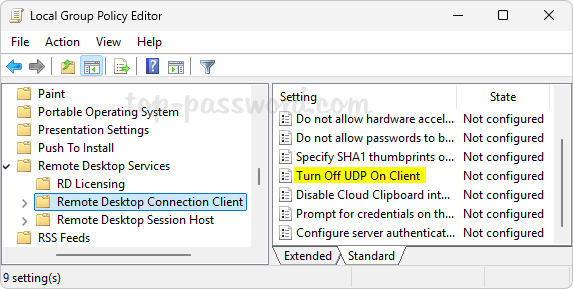
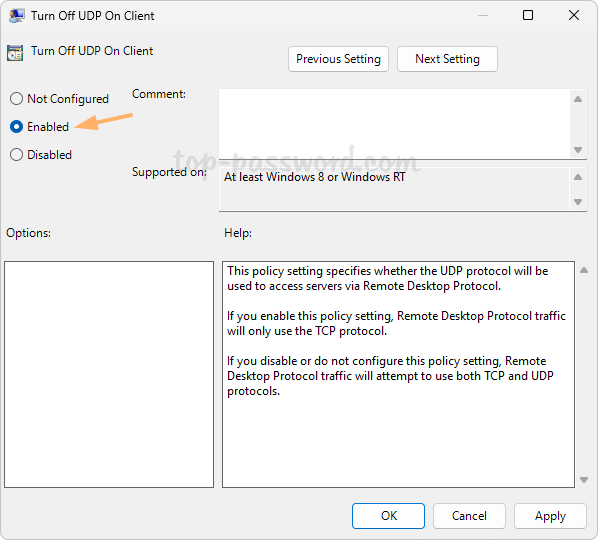
  2. Browse to: Computer Configuration -> Administrative Templates -> Windows Components -> Remote Desktop Services -> Remote Desktop Connection Client. On the right pane, double-click the “Turn Off UDP On Client” policy.

  3. Select the Enabled option. Click Apply and then OK.
  4. Close the Local Group Policy Editor and restart the computer to make this change to take effect. The next time you connect to this PC through RDP and your session won’t keep dropping or disconnect automatically.

After applying the above group policy tweak, remote desktop service will run on TCP protocol only instead of UDP protocol. Whenever Microsoft releases a new update to fix the remote desktop connection issues, you can then disable the above group policy.

How to Disable Notepad AI Rewrite in Windows 11

March 19th, 2025 by Admin

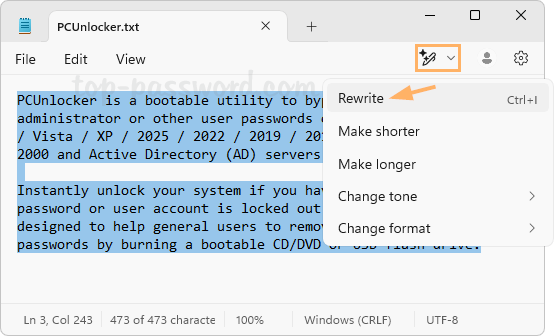
How can I turn off Rewrite AI in Notepad? The Rewrite feature is officially roll out to public users since Notepad version 11.2410.17.0, and it utilizes AI technology to help rewrite sentences or whole paragraphs based on your preferences.

To use Rewrite, you need to sign in to Notepad with Microsoft account, and Copilot AI credits are required. If you don’t have any AI credits, the Rewrite feature becomes useless. In this tutorial we’ll walk you through the steps to disable the Notepad AI Rewrite feature in Windows 11.

How to Disable Notepad AI Rewrite in Windows 11

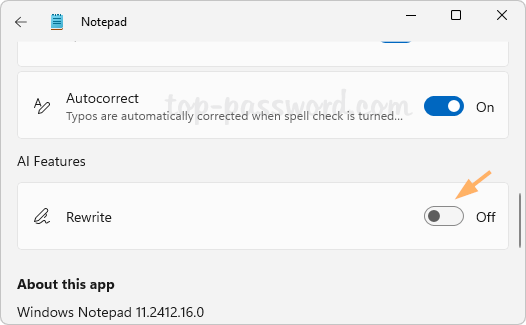
  1. Open any text file with Notepad, and then click the Gear icon in the top right corner.

  2. You will be presented with different settings for Notepad. Under the “AI Features” section, you can toggle the “Rewrite” setting to OFF.

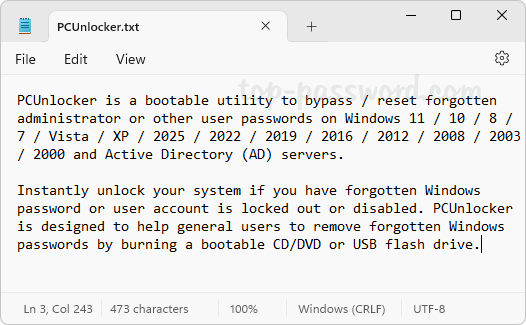
  3. Now you should see the Rewrite icon disappear from the upper right of the Notepad window.

Conclusion

This is how you can disable the Notepad AI Rewrite feature in Windows 11. Each time you rewrite the selected text, it will cost you one AI credit. If you’re unsure how many AI credits you have left, click the Profile icon in the top right of Notepad, you see the AI credit balance for your Microsoft account.

How to Remove “Edit in Notepad” Context Menu in Windows 11

February 26th, 2025 by Admin

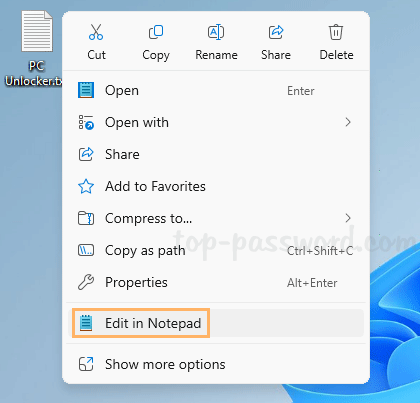
Is there a way to remove “Edit in Notepad” or other unnecessary entries from context menu? If you never choose to use Notepad to open text files, the “Edit in Notepad” context menu will become redundant and you can delete it to keep your context menu neat. In this tutorial we’ll show you an easy way to remove “Edit in Notepad”, “Edit with Photos” or “Edit with Paint” context menus in Windows 11.

How to Remove “Edit in Notepad” Context Menu in Windows 11

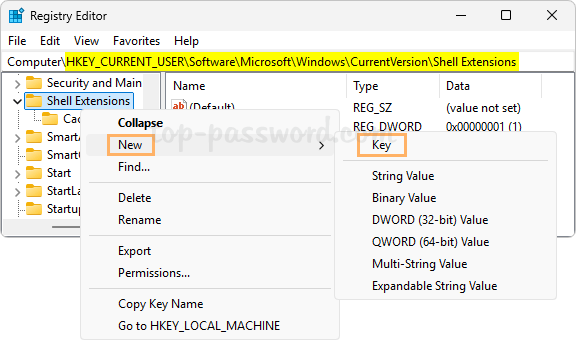
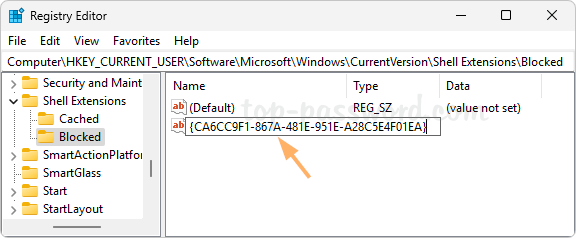
  1. Open Registry Editor and head to this location: HKEY_CURRENT_USER\Software\Microsoft\Windows\CurrentVersion\Shell Extensions. Right-click the “Shell Extensions” key and choose New -> Key.

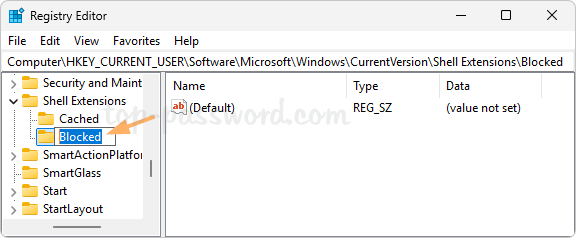
  2. Name the new key Blocked.

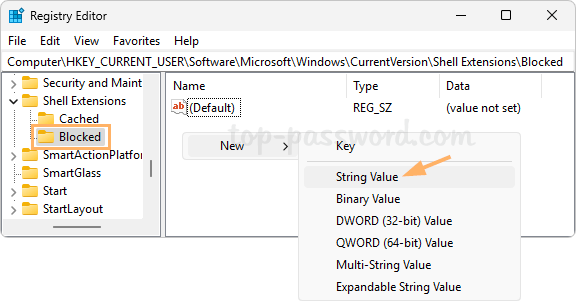
  3. Highlight the “Blocked” key and then go to the right pane, right-click any blank area and choose New -> String Value.

  4. To remove the “Edit in Notepad” context menu, name the new string {CA6CC9F1-867A-481E-951E-A28C5E4F01EA} and press Enter.

    You can also create a string named {BFE0E2A4-C70C-4AD7-AC3D-10D1ECEBB5B4} to remove the “Edit with Photos” context menu, or a string named {2430F218-B743-4FD6-97BF-5C76541B4AE9} to get rid of the “Edit with Paint” menu entry.

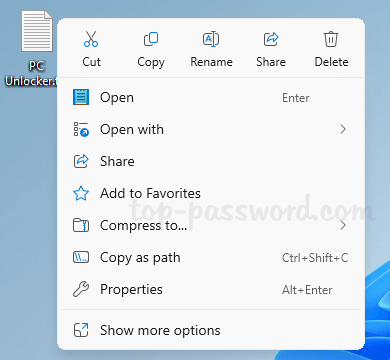
  5. Close Registry Editor. When you right-click any text file on your desktop, you’ll see that the “Edit in Notepad” entry has already disappeared from the context menu. Whenever you need to restore it, just delete the string you’ve created above in the Registry Editor.

Conclusion

The above method allows you to remove “Edit in Notepad”, “Edit with Photos” or “Edit with Paint” from the standard context menu, but these menu entries are still visible from the extended context menu when clicking “Show more options”.

Beginners Guide: Install DeepSeek Locally in Windows 11

February 5th, 2025 by Admin

DeepSeek-R1 is a free yet powerful AI model, with performance comparable to OpenAI-o1. Unlike ChatGPT, DeepSeek-R1 can even function without internet connection and you can install it on your local PC. In this tutorial we’ll walk you through the steps to install DeepSeek-R1 locally in Windows 11 using Ollama.

How to Install DeepSeek Locally in Windows 11

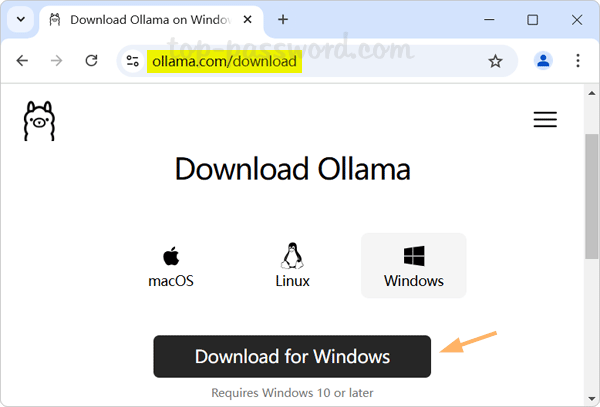
  1. Before getting started, we need to download Ollama from its official website, which enables us to quickly run DeepSeek-R1 locally with minimal configuration. Once the download is complete, double-click it to install on your local system.
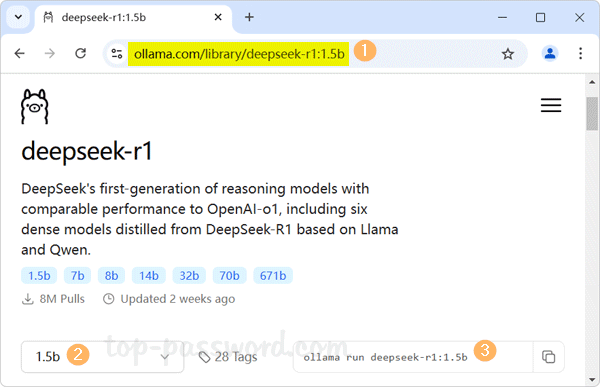
  2. Open the DeepSeek-R1 model page in Ollama, you’ll see different versions available including 1.5b, 7b, 8b, etc. Once choosing the appropriate version based on your PC’s hardware, the installation command will appear in the text box on the right side and you need to copy that command for running it later on.

    • 1.5b: Minimal resource usage (8 GB RAM).
    • 7b, 8b: Balanced performance and resource requirements (GPU: at least 8 GB VRAM).
    • 14b, 32b: Intermediate options for higher performance (GPU: 12-24 GB of VRAM).
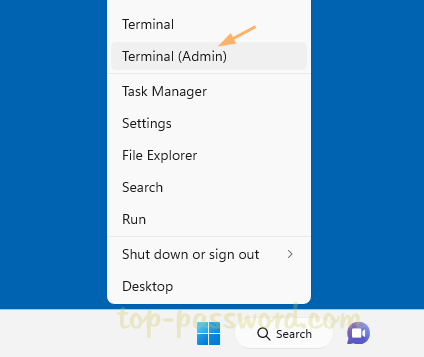
  3. Right-click the Start button in the taskbar and choose “Terminal (Admin)“.

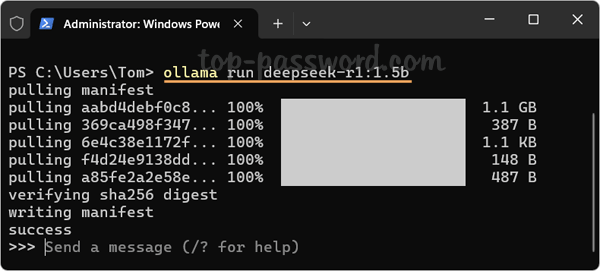
  4. When the Terminal window opens, paste the command you’ve copied previously and then press Enter. Wait for Ollama to download the DeepSeek-R1 model and this process could take a few minutes depending on your internet speed, as the model is several gigabytes in size.

  5. Once it’s done, you can begin interacting with DeepSeek-R1 via the command line. When the session is closed, you can launch a new session by running the command: ollama run deepseek-r1.

Conclusion

That’s how to easily install DeepSeek-R1 model locally on Windows 11 computers. If your computer has a high performance GPU and enough memory, you can install multiple versions of DeepSeek-R1 and find out which one works the most ‌efficiently‌.

How to Extract Drivers or Files from .MSI without Installing

January 13th, 2025 by Admin

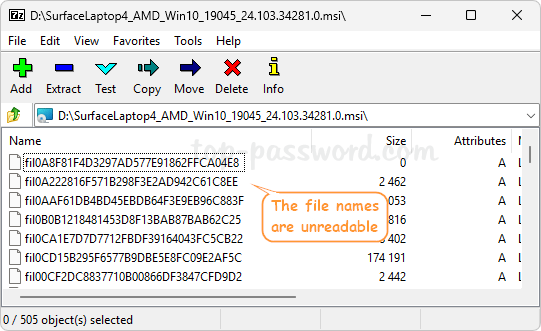
How could I extract drivers from a MSI file without installing them to a machine? Need to get files inside a .msi package? Yesterday I got a help request from a client who wanted to import Surface laptop drivers into PCUnlocker, and the driver packages from Microsoft are in .msi format. When opening a single .msi file using the freeware 7-Zip, we found the filenames are totally unreadable.

Eventually we found the solution. In this tutorial we’d like to share the correct method of extracting drivers or files from a .MSI package without installing them to your system.

How to Extract Drivers or Files from .MSI without Installing

  1. Right-click the Start button in the taskbar and select Terminal (Admin).

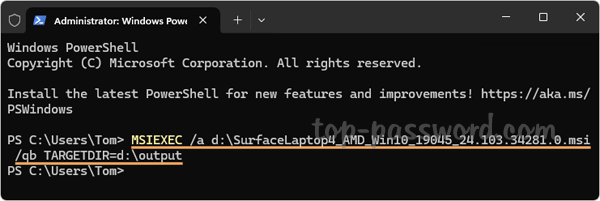
  2. To extract files from a .msi package, type the following command and press Enter. Make sure you replace path_to_msi_file with the path of your .msi file, and replace path_to_output_folder with your destination folder.
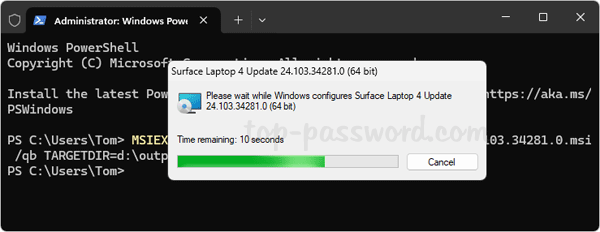
    MSIEXEC /a path_to_msi_file /qb TARGETDIR=path_to_output_folder

  3. The installer will display a simple progress UI while unpacking.

  4. When the unpacking is done, just open File Explorer and browse to your destination folder. You can then find the extracted drivers or files there.

That’s it!

3 Easy Ways to Delete Themes in Personalization on Windows 11

December 30th, 2024 by Admin

How can I uninstall or remove Windows 11 themes at once? A different theme can be applied to change your desktop appearance including wallpaper, colors, icons and so on. There are thousands of themes available in Microsoft Store, so it’s natural to try some out. After you find the right one, you may want to delete all of the other installed or even built-in themes. In this tutorial we’ll show you 3 easy ways to delete and remove either installed or default themes in Personalization on Windows 11.

Method 1: Delete A Theme in Personalization on Windows 11

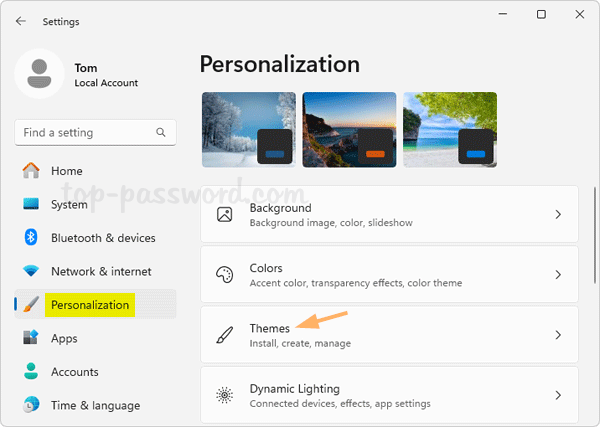
  1. Press the Windows key + I at the same time to open Settings. Choose Personalization on the left side, and click Themes on the right pane.

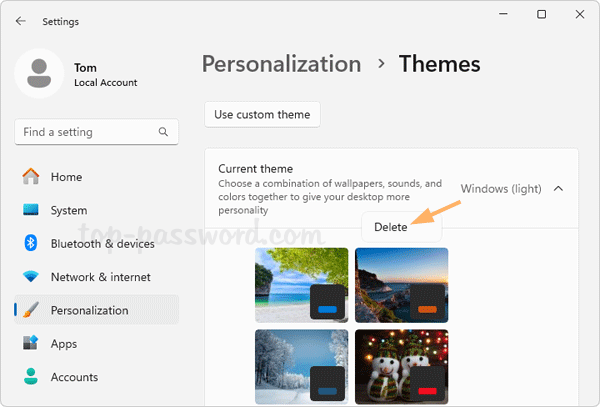
  2. Right-click on each theme and you’ll see the “Delete” button, which allows you to delete a theme at one time. If the “Delete” button is greyed out, it indicates that theme is a default theme pre-installed on Windows 11 or it is the currently active theme.

  3. You can repeat the same steps to delete other themes you’ve installed.

Method 2: Delete All Installed Themes at Once on Windows 11

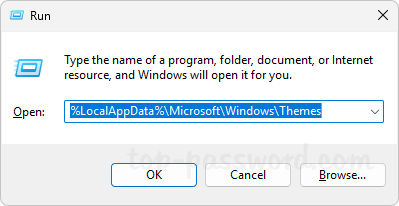
  1. Press the Windows key + R together to bring up the Run box, type the following and press Enter.
    %LocalAppData%\Microsoft\Windows\Themes

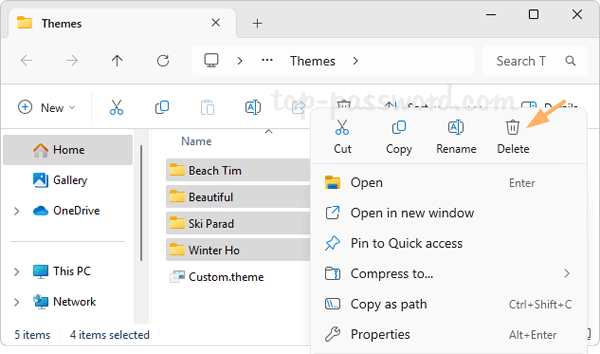
  2. In the pop-up File Explorer window, you’ll see individual folders for each theme which you have ever downloaded and installed from Microsoft Store.

  3. To delete all installed themes, just select all of those folders, right-click on them and choose Delete. This method can also delete a theme that is currently active on your system.

Method 3: Delete Built-in Themes on Windows 11

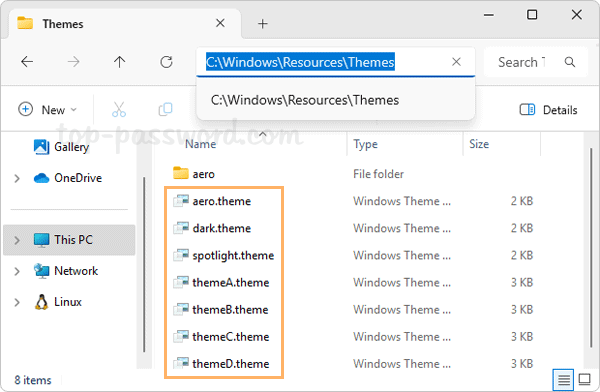
  1. Open File Explorer and browse to: C:\Windows\Resources\Themes. Each theme is represented by a file with the extension “.theme. You can double-click one of them to apply the theme immediately.
    Windows (light): aero.theme
    Windows (dark): dark.theme
    Windows Spotlight: spotlight.theme
    Glow: themeA.theme
    Captured Motion: themeB.theme
    Sunrise: themeC.theme
    Flow: themeD.theme

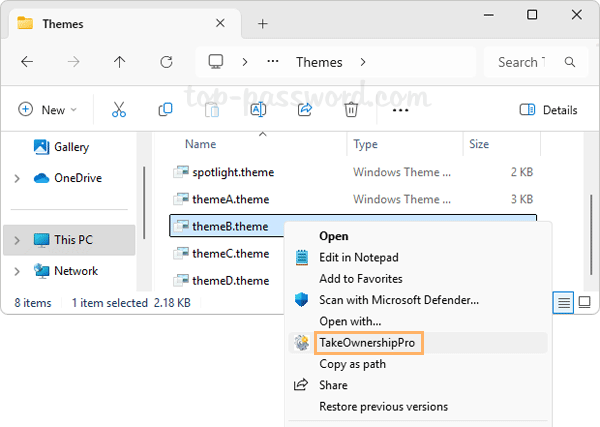
  2. By default, those .theme files can’t be deleted directly. You need to grant full permissions to your current Windows account firstly. To simplify this process, you can take use of the freeware TakeOwnershipPro. After installing, just right-click on those .theme files and select “Show more options” -> “TakeOwnershipPro“.

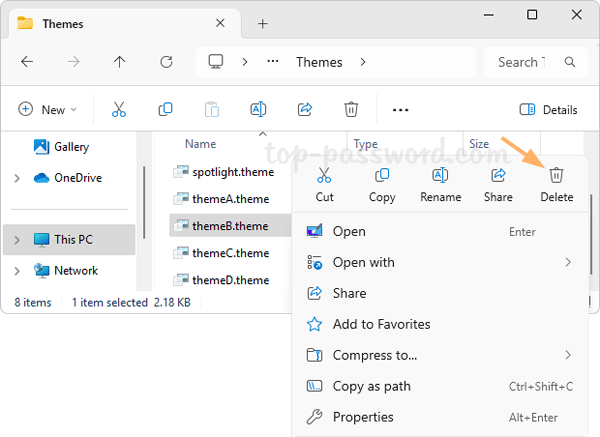
  3. Then you can delete the .theme files as usual.

    Note that this method can also be used to delete your current active default theme. Whenever you need to delete the high contrast themes, just go to the location: C:\Windows\Resources\Ease of Access Themes and repeat the above steps.

That’s it!

How to Join Windows 11 PC to Windows Server Domain

December 12th, 2024 by Admin

Looking for an easy way to add Windows 11 to an office network/domain? Joining a Windows 11 PC to AD domain is not straightforward for beginners. In the tutorial we’ll walk you through the steps to join Windows 11 PC to Windows Server domain.

How to Join Windows 11 PC to Windows Server Domain

Before getting started, make sure that your Windows Server has already been promoted to a domain controller and you know exactly the domain name. Then follow the steps outlined below to join your Windows 11 PC to that domain.

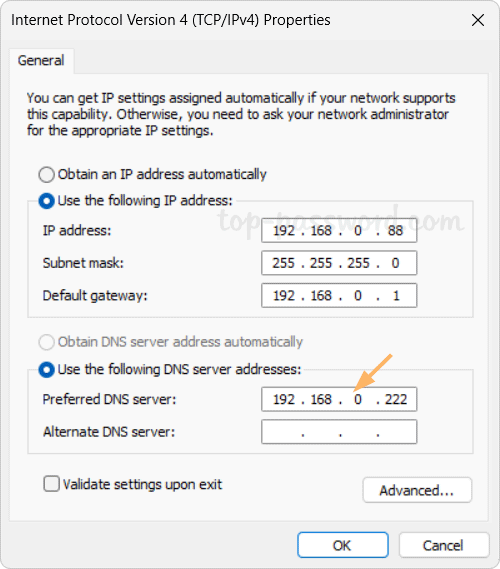
  1. First of all, open Windows Terminal and ping the domain name of your remote Windows Server DC. If it can’t be resolved, then you need to open network adapter settings and specify the IP address of Windows Server DC as the preferred DNS server.

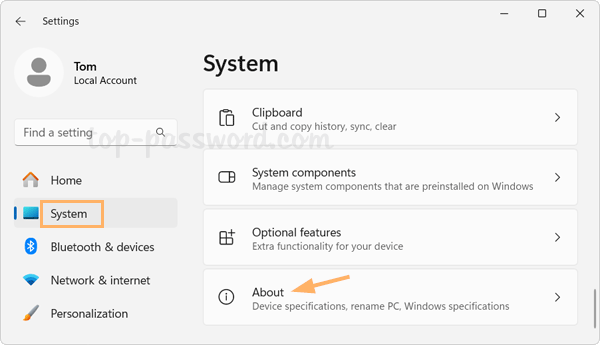
  2. Press the Windows key + I together to open the Settings app. Choose the System menu at the left navigation column and then click About on the right side.

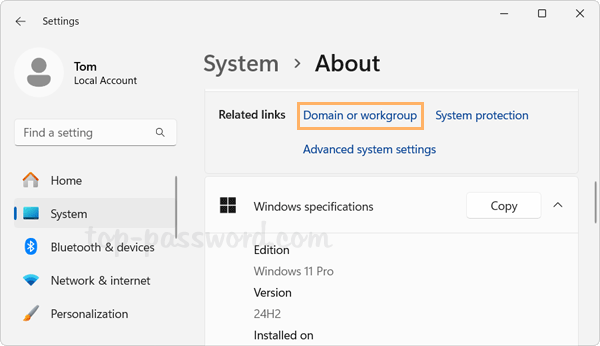
  3. Look for the “Related links” section, and then click the “Domain or workgroup” link.

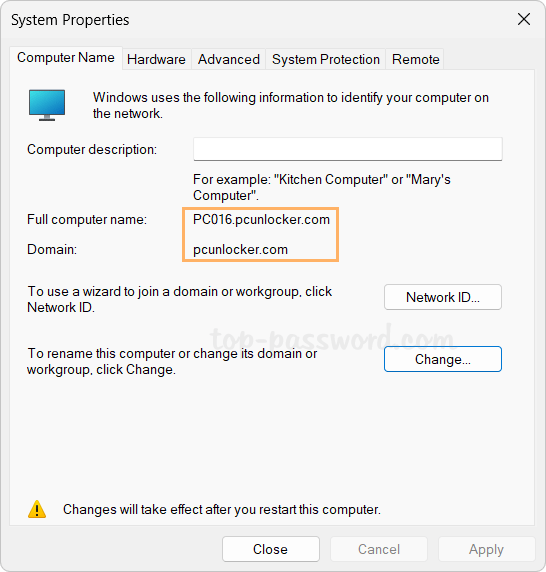
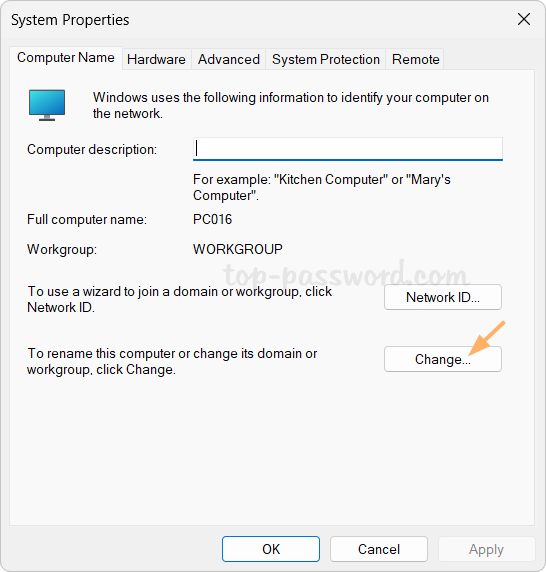
  4. The System Properties dialog will open up. Just click the Change button.

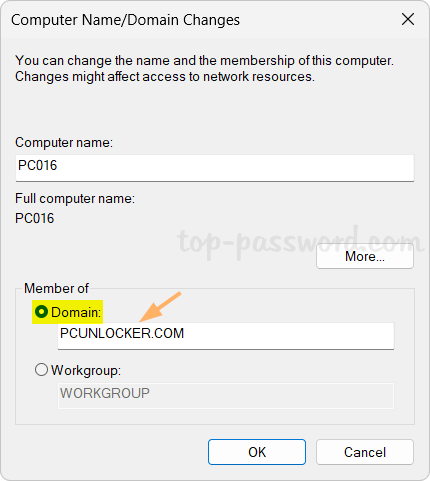
  5. Under the “Member of” section, click Domain, type the domain name of your Windows Server DC that you wish this computer to join, and then click OK.

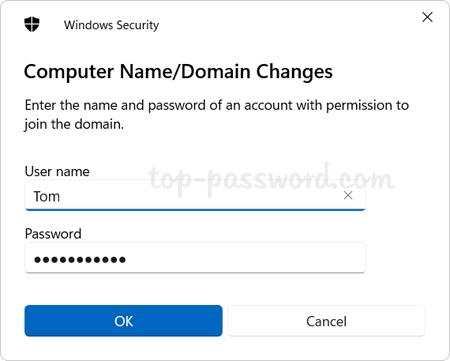
  6. Type in the username and password of your domain account which has been set up in your Windows Server DC, and click OK.

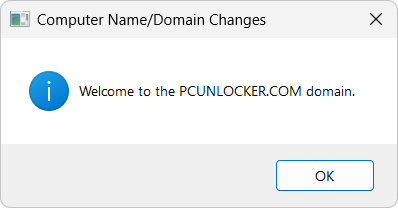
  7. You’ll receive the welcome information for joining the domain, and a reboot is required for applying the changes.

That’s how you can easily join a Windows 11 computer to Windows Server domain. Whenever you need to remove that computer from domain, the steps are also quite easy.

How to Create a Hidden Shared Folder in Windows 11

December 4th, 2024 by Admin

Is there a way to share a folder on a network without giving out your username and password? You can create a hidden shared folder and make it only visible to guests who know the exact name of your shared folder, and public users will be unaware of your shared folder. In this tutorial we’ll walk you through the steps of creating a hidden shared folder in Windows 11.

How to Create a Hidden Shared Folder in Windows 11

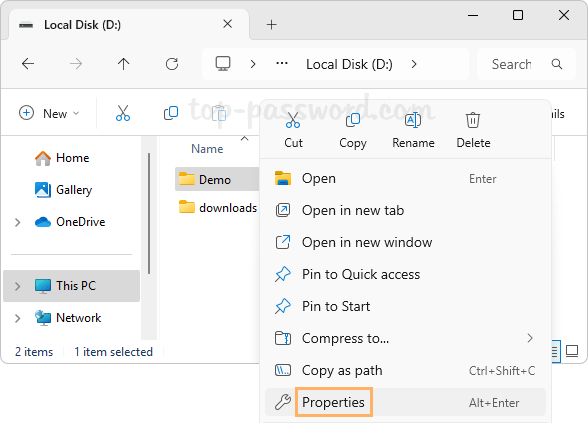
  1. Open File Explorer and navigate to the folder which you want to share. Right-click on that folder and select Properties from the pop-up menu.

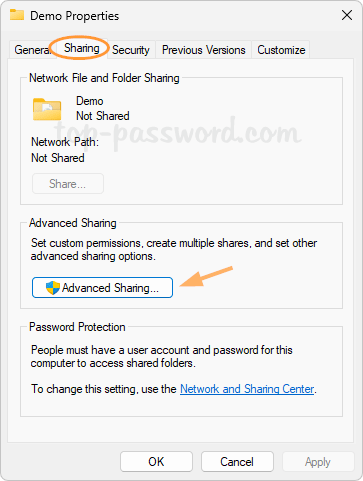
  2. Go to the Sharing tab and then click the Advanced Sharing button.

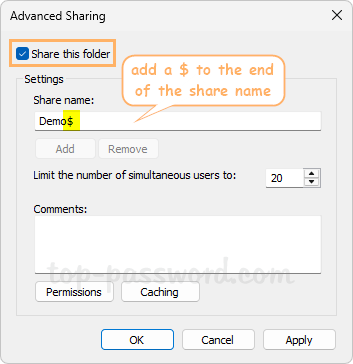
  3. Check the “Share this folder” box, set the share name as appropriate. To make this share hidden, add a $ to the end of the share name.

    If you’d like to share this folder to your friends without giving out the login credentials of your Windows account, click the Permissions button below to grant its access rights to the “Guests” group.

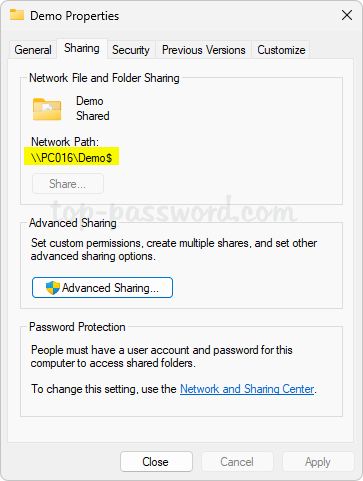
  4. When it’s done, go back to the Properties dialog and you can see the full network path for accessing your hidden shared folder.

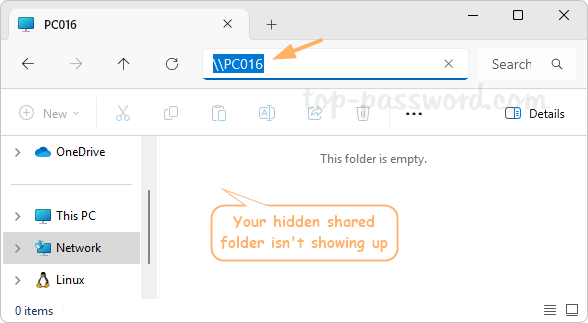
  5. When a curious visitor on the same network tries to see what is shared on your PC, your hidden shared folders won’t show up at all.

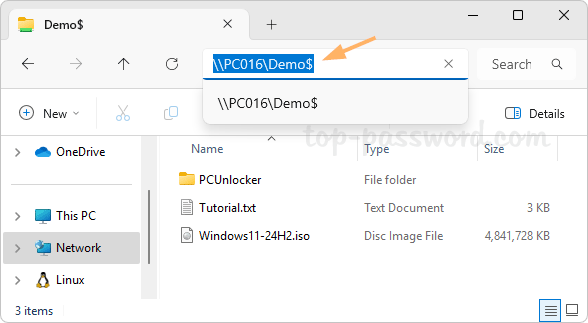
    Only your friend who knows exactly the name of your hidden shared folder can access it, by entering the full network path. Whenever you don’t want to share it any longer, you can stop sharing the folder using different methods.

Conclusion

Creating a hidden share is an convenient way to share folders and files on the same network, while preventing unwanted public users from accessing it. The authorized users don’t need to log on to your Windows account on their own PCs in order to be eligible for your hidden share. If you want to hide a shared folder from your local computer, the Protect My Folders utility could be of help.