Archive for the ‘Windows 8’ category

How to Enable USB Write Protection in Windows 10, 8 and 7

October 1st, 2016 by Admin

Worry about someone copying files off your PC via USB drive? The most common solution is to disable or restrict the usage of USB ports. In this tutorial we’ll show you another way to enable write protection of all USB drives that are connected to your Windows operating system.

How to Enable USB Write Protection in Windows 10, 8 and 7?

  1. Press the Windows key + R to open the Run box. Type regedit and press Enter.
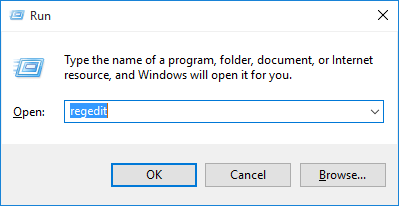
    regedit-via-run

  2. This will open the Registry Editor. Navigate to the following key:
    HKEY_LOCAL_MACHINE\SYSTEM\CurrentControlSet\Control
  3. Right-click on the Control key in the left pane, select New -> Key. Name it as StorageDevicePolicies.
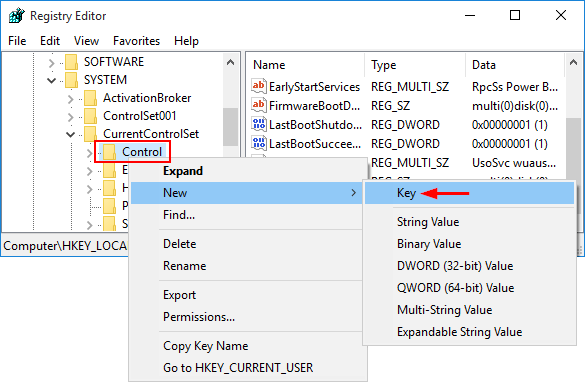
    new-registry-key

  4. Select the StorageDevicePolicies key in the left pane, then right-click on any empty space in the right pane and select New -> DWORD (32-bit) Value. Name it WriteProtect.
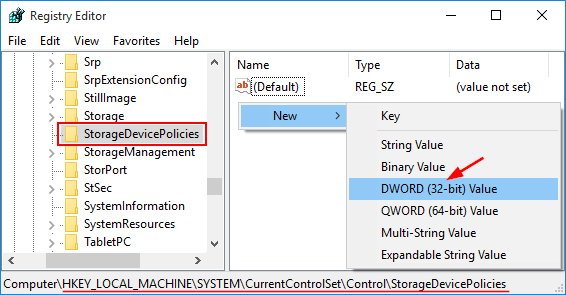
    new-dword-value

  5. Double-click on WriteProtect and then change the value data from 0 to 1.
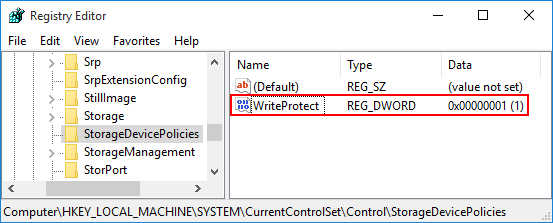
    usb-write-protect

  6. The new setting takes effect immediately. Every user who tries to copy / move data to USB devices or format USB drive will get the error message “The disk is write-protected“. We can only open the file in the USB drive for reading, but it’s not allowed to modify and save the changes back to USB drive.
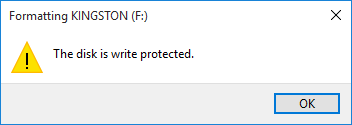
    disk-is-write-protected

So this is how you can enable write protection to all connected USB drives. If you want to disable write protection at a later time, just open Registry Editor and set the WriteProtect value to 0.
How to Reset Local Group Policy Settings to Default with / without Login

September 30th, 2016 by Admin

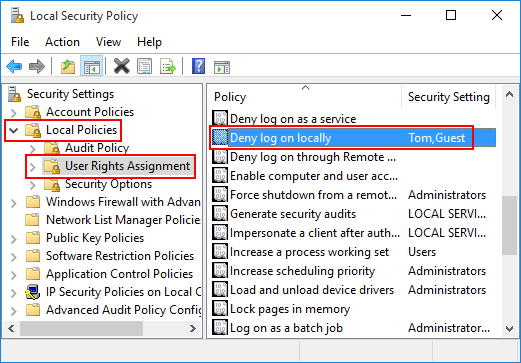
Is there a way to bypass group policy? Group policy settings are messed up? You might be restricted from modifying certain system settings or you’re denied to log on to Windows. In this tutorial we’ll show you a simple way to reset local group policy settings to default, even if you couldn’t log into Windows.
Where Group Policy Settings are Stored

A local Group Policy object exists on every Windows-based computer, including Windows Home edition. The Local Group Policy is divided into two broad categories – Computer Configuration and User Configuration. All system-wide policies are stored under Computer Configuration, while user-specific settings are stored under User Configuration.

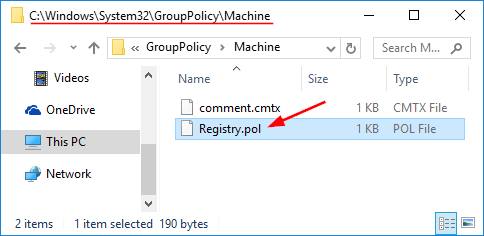
The group policy settings are stored in a file named Registry.pol under your system drive.

  • Computer-wide settings (Computer Configuration) – %SystemRoot%\System32\ GroupPolicy\Machine\registry.pol
  • User-specific settings (User Configuration) – %SystemRoot%\System32\ GroupPolicy\User\registry.pol

group-policy-location

Now that we know where the group policy settings are stored, we can reset them to default easily. No need to reinstall Windows when your group policy is messed up.

Method 1: Reset Local Group Policy Settings to Default After Login

  1. Open an elevated Command Prompt in Windows.
  2. At the Command Prompt, type the following commands one by one, press Enter after each.
    RD /S /Q "C:\Windows\System32\GroupPolicy"
    RD /S /Q "C:\Windows\System32\GroupPolicyUsers"

    This will delete all your group policy settings (Registry.pol) stored on your computer.

    reset-group-policy-to-default

  3. Now you’ve reset the group policy objects to default. Restart your computer for the changes to take effect.

Method 2: Reset Local Group Policy Settings to Default without Login

When you’re unable to boot or log into Windows any longer, or you have insufficient privileges to open up Command Prompt, just boot your PC from Windows installation disc and you can reset local group policy to default from outside Windows.

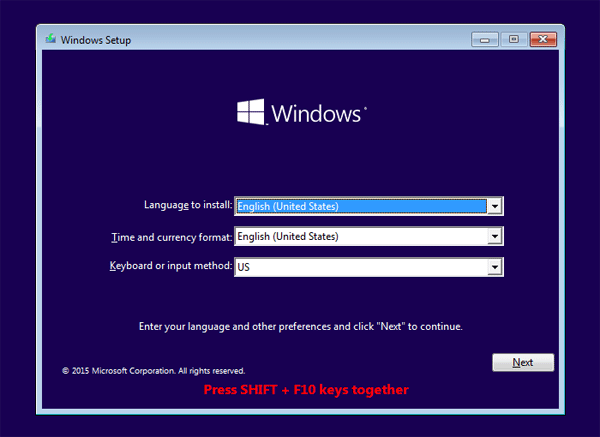
  1. Boot your PC with Windows installation DVD. When you comes to the Windows Setup screen, press SHIFT + F10 keys to open the Command Prompt.

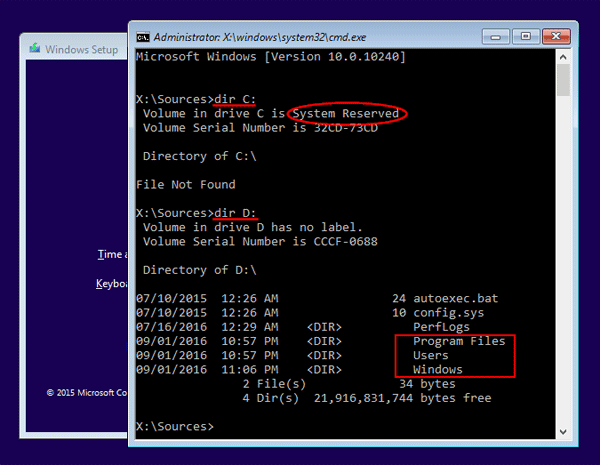
  2. At the Command Prompt, use the dir command to find the drive where your Windows is installed.

    find-windows-partition

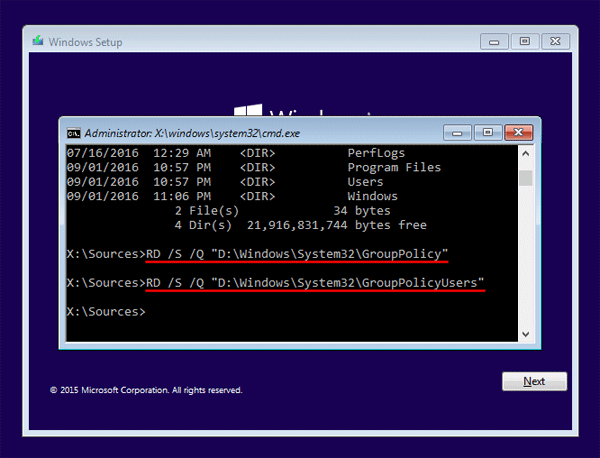
  3. Run the following commands one by one. Replace D:\ with the drive letter of your Windows partition.

    RD /S /Q "D:\Windows\System32\GroupPolicy"
    RD /S /Q "D:\Windows\System32\GroupPolicyUsers"

    reset-group-policy-settings

  4. When it’s done, quit Windows Setup and take out the DVD, reboot your computer and the local group policies should have been reset to default. When you later make changes with the group policy, Windows will create a new Registry.pol file to store your settings.

How to Remove Shortcut Arrow from Desktop Icons in Windows 10 / 8 /7

September 23rd, 2016 by Admin

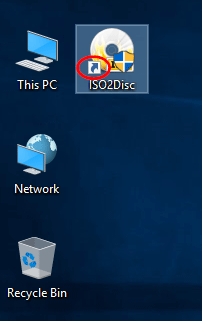
By default, Windows places a small arrow in the bottom left corner of the desktop shortcut icon. The arrow can help you distinguish a shortcut from an application or file. If you are not happy to see the shortcut overlay icon, you can get rid of it completely. In this tutorial we’ll show you how to hide / remove shortcut arrow from desktop icons in Windows 10/8/7.

desktop-shortcut-arrow

How to Remove Shortcut Arrow from Desktop Icons in Windows 10 / 8 /7?

  1. Open the Registry Editor. When prompted Do you want to allow this app to make changes to your PC? Choose Yes.

    regedit-via-run

  2. In the Registry Editor, navigate to the following key:
    HKEY_LOCAL_MACHINE\SOFTWARE\Microsoft\Windows\CurrentVersion\Explorer\Shell Icons

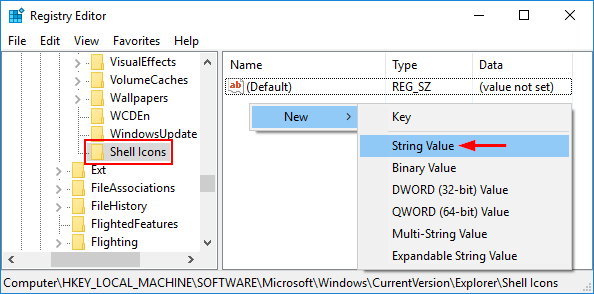
    If the Shell Icons key does not exist you’ll need to create it. To do so right-click the Explorer key in the left pane, then select New > Key and name it Shell Icons.

    create-shell-icons-key

  3. In the right pane of the Shell Icons key, right-click on any empty area, and select New > String Value. Name it 29.

    add-string-value

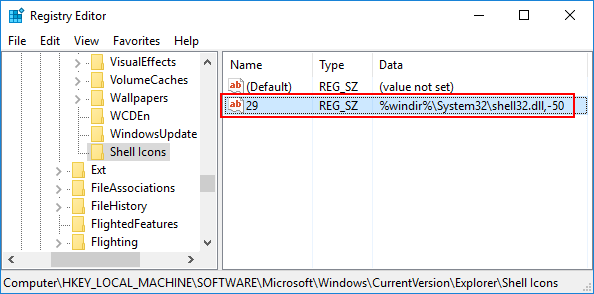
  4. Double-click the 29 entry to modify it. In the Value Data box, copy and paste the following:
    %windir%\System32\shell32.dll,-50

    remove-shortcut-arrow

  5. Click OK and exit Registry Editor. Reboot your computer and you should no longer see the little arrow in your desktop shortcuts. That’s it!

Problem of Black Square:

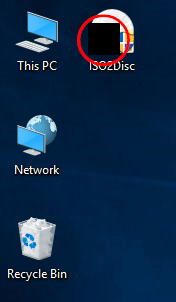
Everything worked just fine but after a second shut down, all shortcut icons have a blank square superimposed over the lower left side.

shortcut-black square

To fix this issue, just open the Registry Editor and navigate to KEY_LOCAL_MACHINE\SOFTWARE\Microsoft\Windows\CurrentVersion\Explorer\Shell Icons. Double-click the 29 entry in the right pane, leave Value Data empty and click OK.

shell-icons-shortcut

Reboot your computer and it should work now!

Add “Copy To” & “Move To” Shortcut to Windows Right-Click Menu

September 21st, 2016 by Admin

How do you copy or move a file to another location in Windows? Most of us use the Copy or Cut command from the Context Menu, and then paste the file in the destination location. To speed up the file copying / moving operations, you can add the “Copy To” or “Move To” shortcuts to Windows right-click context menu. This is a hidden feature available in Windows 11/10/8/7, which can be enabled using a registry hack.

How to Add “Copy To” & “Move To” Shortcut to Windows Right-Click Menu?

  1. Open Registry Editor and navigate to the following key:

    HKEY_CLASSES_ROOT\AllFilesystemObjects\shellex\ContextMenuHandlers

  2. Right-click on the ContextMenuHandlers key in the left pane, and then select New -> Key.

    1

    Rename the new subkey from “New Key #1” to {C2FBB630-2971-11D1-A18C-00C04FD75D13}. This will immediately add the “Copy To folder” shortcut to Explorer context menu.

  3. If you want to add the “Move To folder” shortcut to Explorer context menu as well, repeat the same steps to create a new subkey named {C2FBB631-2971-11D1-A18C-00C04FD75D13}.

    2

  4. Now right-click on any folder or file on your computer, you’ll see two extra options (“Copy To folder” and “Move To folder“) have been added to the context menu.

    3

  5. After selecting either “Copy To folder” or “Move To folder” from Windows right-click menu, a browse window will open. From there you can select your destination folder, click either the Copy or Move button (depending on your chosen action) and you’re done!

    4

How to Backup and Restore Device Drivers in Windows 10 / 8 / 7

September 21st, 2016 by Admin

Every time you reinstall Windows, you have to download and install drivers again. But what to do if you don’t remember where you downloaded all your individual drivers from, or you lost the disc provided by your computer vendor? Luckily Windows comes with a built-in command line tool – DISM, which can make a backup of all installed drivers from a working PC.

In this tutorial we’ll show you how to use the DISM command to backup your device drivers and then restore them in Windows 10, 8 and 7, no need to use any third-party software.

Part 1: Backup Third Party Device Drivers

  1. Open the Command Prompt as administrator.
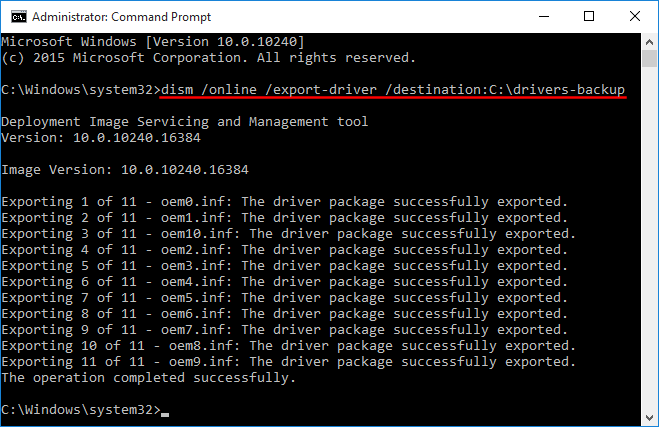
  2. Type the following command at the Command Prompt and press Enter.

    dism /online /export-driver /destination:C:\drivers-backup

    backup-driver-with-dism

    Replace the destination path (“C:\drivers-backup“) with the actual folder where you will store the drivers. It can be a folder on a separate partition or USB thumb drive. Make sure that folder is created before you run the above command.

  3. It begins to grab the drivers from your system drive and store them in your destination location. When it’s done, your destination folder will be filled with the driver files (.inf, .cat, .sys).

Part 2: Restore & Install Device Drivers

Once you’ve reinstalled Windows, you can manually restore and install the driver from your previous backup. Follow these steps:

  1. Open Device Manager. Due to lack of driver installation, some devices have a little yellow question mark over its icon, and they should have more descriptive names.
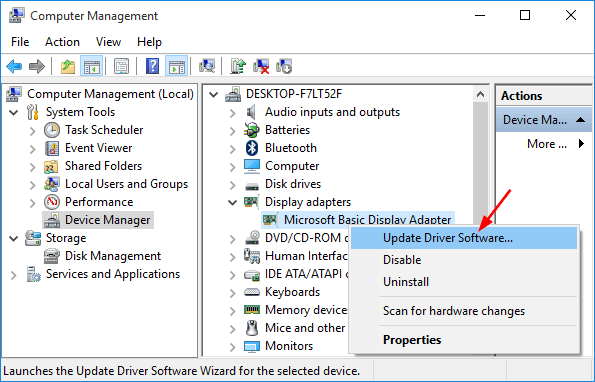
  2. Select a device from the device tree, right-click on it and select “Update Driver Software” from the drop-down menu.

    update-driver-software

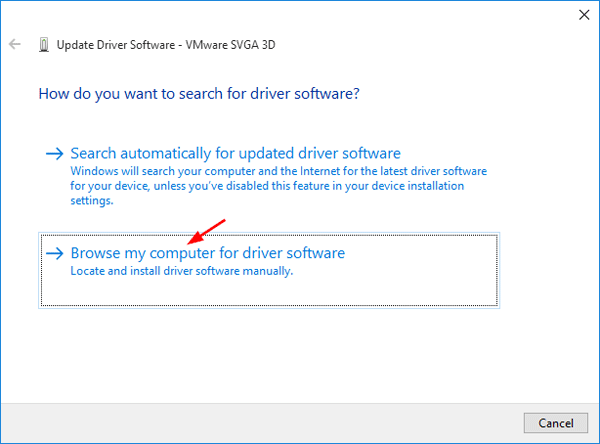
  3. In the pop-up window, you will see two options. Click Browse my computer for driver software.

    search-for-device-driver

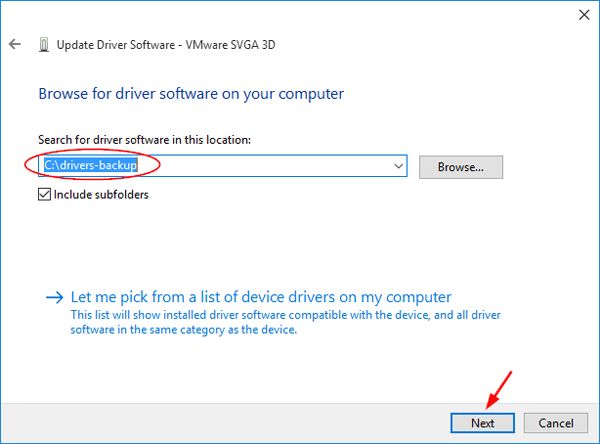
  4. Click on Browse to find the location of the driver files you backed up previously and click Next. Make sure the “Include subfolders” option is checked.

    browse-driver-backup

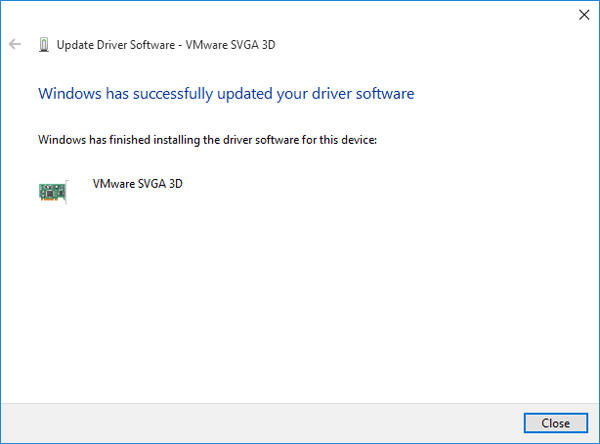
  5. After a while you’ll see the message saying “Windows has successfully updated your driver software” and now the device name should be displayed correctly.

    successfully-installed-driver

Updated: This method also works with Windows 11. However, there are other ways available for you to restore Windows device drivers from Command Prompt rather than Device Manager.

How to Stop Check Disk (Chkdsk) From Running at Startup

September 18th, 2016 by Admin

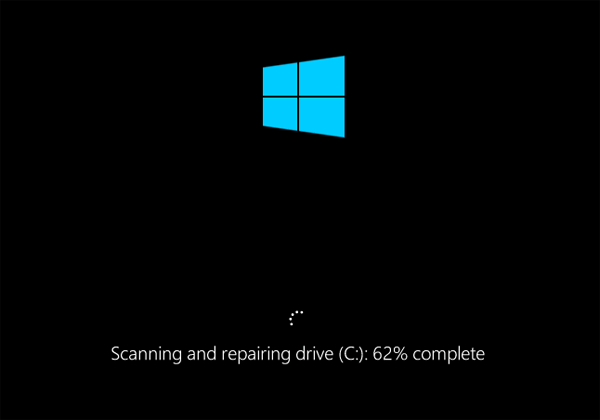
There are some situations where your PC needs to run a check disk at startup or reboot. For instance, if you run the chkdsk command on a system drive that is being used to run the Windows OS, it will schedule a disk check to run at the next reboot. Windows might also force an automatic disk check when your computer shuts down unexpectedly.

disk-checking-at-boot

Checking disk could be a really time-consuming task. If you don’t want Windows to take its time during the next reboot, here is how you can cancel or stop check disk (chkdsk) from running at Startup in Windows 10, 8, 7, Vista and XP.

Part 1: Check if a Manual/Automatic Disk Check is Scheduled

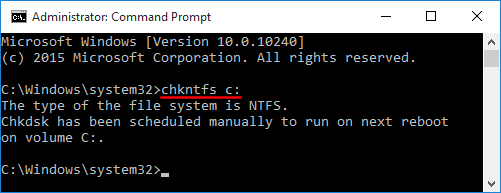
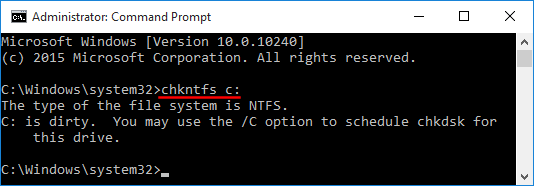
Open a Command Prompt as an administrator in Windows. Type in the following command and press Enter.
chkntfs C:

If there is a chkdsk task scheduled you will receive a response that is similar to “chkdsk has been scheduled manually to run on next reboot.

disk-check-schedule

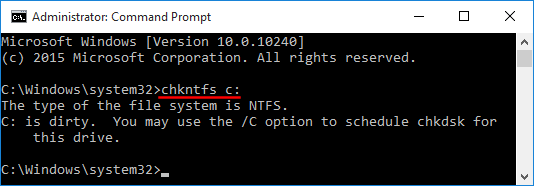
If a dirty flag is set on your drive, the system will force an automatic disk check at the next reboot.

disk-dirty

Part 2: Stop Check Disk from Running at Startup

The methods of stopping check disk varies depend on how it is scheduled.

Option 1: Cancel the Automatic Disk Check

When the computer boots up with the dirty bit enabled on a drive, you will be asked to check the disk for consistency before Windows is loaded. But sometimes Windows might keep running check disk automatically on every reboot and this could be quite annoying. To stop the automatic disk check, you have to clear the dirty bit by following this tutorial: How to Manually Clear or Set Dirty Bit on Windows Volume

Option 2: Cancel the Scheduled Disk Check

It’s much easier to stop the scheduled disk check. You can cancel the scheduled disk check using either Command Prompt or Registry Editor.

Method 1: Using Command Prompt

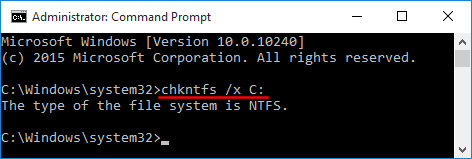
Open a Command Prompt as an administrator. If you want to disable a scheduled disk check on C: drive, type the following command and press Enter.
chkntfs /x C:

cancel-scheduled-diskcheck

Method 2: Using Registry Editor

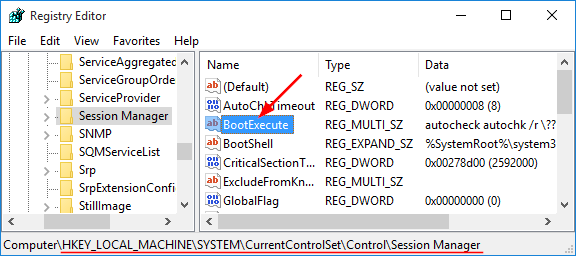
Open the Registry Editor. Navigate to the following keys:
HKEY_LOCAL_MACHINE\SYSTEM\CurrentControlSet\Control\Session Manager

Double-click on the Multi-String value “BootExecute” in the right pane.

boot-execute

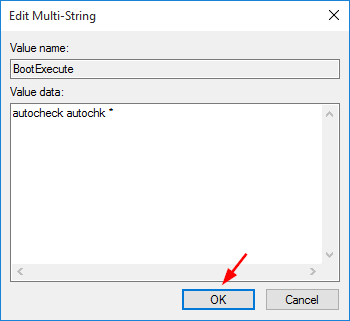
This will open the “Edit Multi-String” window. Click in the Value data box, and then delete all of the lines, except the last one.

cancel-disk-checking

When it’s done, click OK and close Registry Editor.

How to Manually Clear or Set Dirty Bit on Windows Volume

September 17th, 2016 by Admin

When a dirty bit is set on a volume, Windows automatically performs a disk checking the next time the computer is restarted. You can run the chkntfs command at the Command Prompt to check if a volume is dirty, but there is no way to clear the dirty bit unless you let Windows go through disk scanning at boot.

disk-dirty

In this tutorial we’ll show you how to manually clear or set the dirty bit for a NTFS & FAT32 volume in Windows 10, 8, 7, Vista and XP. The procedure requires you to use a disk editor software such as WinHex. If you want to edit the dirty bit for a system volume currently in use, you need to use a WinPE bootable CD to boot off your PC.

How to Manually Clear or Set Dirty Bit on Windows Volume?

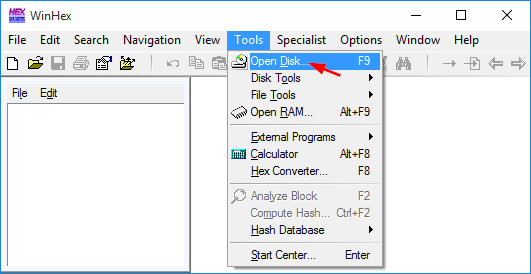
To get started, open WinHex as administrator rights. Click the Tools menu and select Open Disk.

open-disk-with-winhex

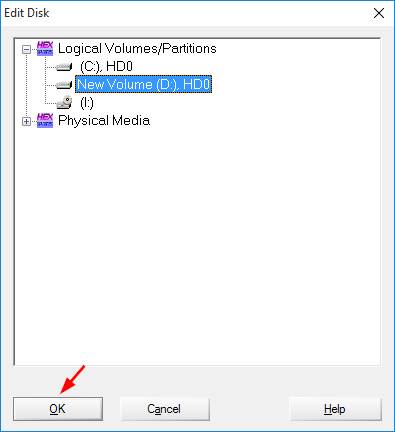
When prompted to select a drive for editing, choose the logical volume you want to edit the dirty bit on, and then click OK.

edit-logical-volume

For FAT32 Volume:

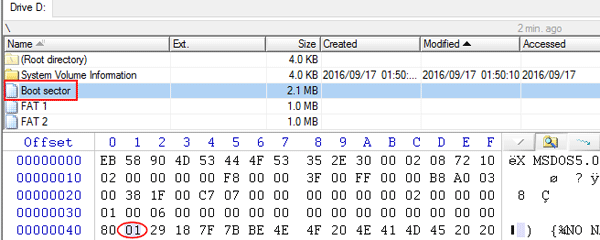
Click on “Boot sector” at the directory browser. The dirty bit for FAT32 volume is located at offset 0x41. If this volume is dirty, the bit should be 01. Just change 01 to 00 and then save your changes back to disk, now you’ve successfully cleared the dirty bit.

fat32-dirty-bit

For NTFS Volume:

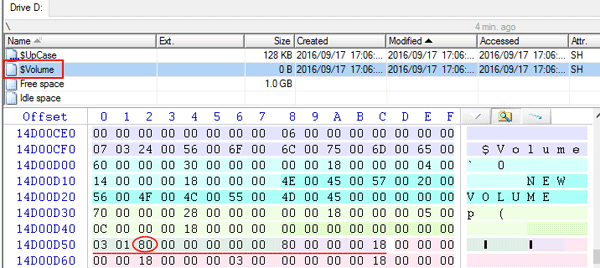
Click on $Volume at the directory browser. The offset location of the dirty bit is slightly different on every NTFS volume. To locate the dirty bit, look for a hex string of 13 bytes, beginning with 03 01, ending with 80 00 00 00 18. You should be able to find a match within the first or second sector.

ntfs-dirty-bit

The dirty bit is the 3th byte of the hex string that I’ve circled with red line. To set a dirty flag on the drive, just change it to 01. Or change it to 00 if you want to clear the dirty flag.

When it’s done, commit the change to the disk.

3 Ways to Run Disk Error Check in Windows 10, 8 and 7

September 17th, 2016 by Admin

All versions of Windows come with a useful disk checking feature which can check the integrity of your hard disk, fix file system errors and scan for bad sectors. In this tutorial we’ll show you 3 ways to run disk error check in Windows 10, 8 and 7.

Method 1: Run Disk Check from Windows Explorer

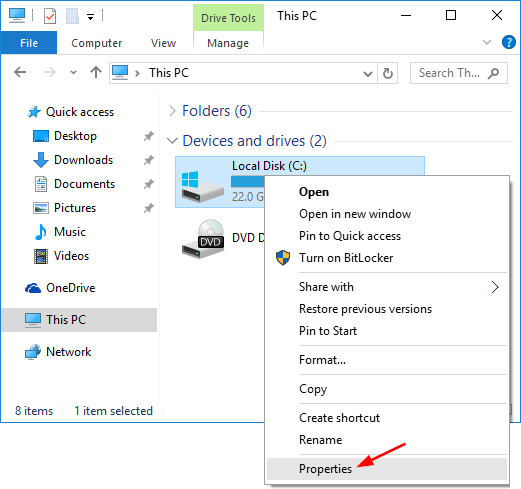
  1. Open Windows Explorer. Right-click on the drive you want to run the disk check on, and choose Properties.

    disk-properties

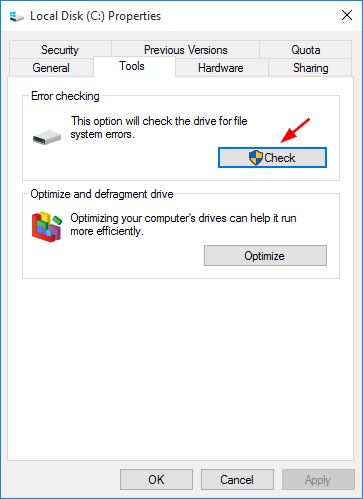
  2. Select the Tools tab. Under the “Error checking” section, click on the Check button.

    disk-error-checking

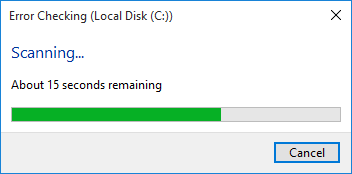
  3. Click on Scan drive button to run the disk check.

    scanning-disk

    If your selected drive is a system partition that is being used, Windows will let you schedule a disk check on the next restart.

Method 2: Run Disk Check Using the Chkdsk Command Line

  1. Open an elevated Command Prompt.

    • In Windows 10/8, simply press the Windows key + X and select “Command Prompt (Admin)“.
    • In Windows 7, click on Start, navigate to Accessories, right-click on Command Prompt and select Run as administrator.
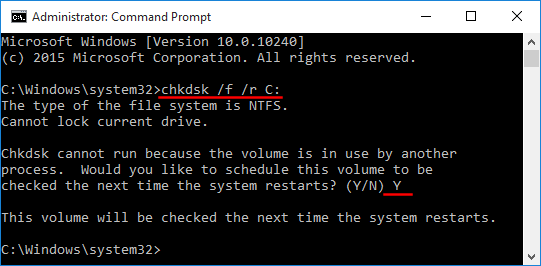
  2. You can run the chkdsk command to run the disk check. Replace C: with the letter of the drive you’d like to run a disk check.

    chkdsk /f /r C:

    chkdsk-cmd

    The /f flag tells windows to fix any issues and the /r flag tells it to do a deep scan. It locates bad sectors and recovers whatever information is readable.

Method 3: Run Disk Check By Setting The Dirty Bit

Sometimes if your PC is not properly shut down or crashed, a dirty flag is set on the disk to force disk check to be run at the next reboot. Here is a simple way to set a dirty bit for your drive manually:

  1. Open an elevated Command Prompt.
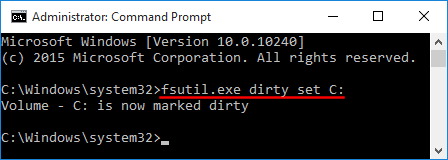
  2. Type the following command and press Enter. Replace C: with the letter of the drive you want to set as dirty.
    fsutil.exe dirty set C:

    mark-disk-dirty

  3. Reboot your computer and Windows will force a disk check on your specified drive.