Archive for the ‘Windows 10’ category

3 Ways to Change Screen Buffer Size in Windows Command Prompt

May 6th, 2019 by Admin

How can I increase the screen buffer size of Command Prompt? The screen buffer size of Command Prompt is expressed in terms of a coordinate grid based on character cells:

  • The width is the number of characters that are displayed on a line in the Command Prompt window. The larger the width size, the more characters will show in the same row before wrapping.
  • The height is the number of lines that are stored in the memory.

In this tutorial we’ll show you 3 simple ways to permanently or temporarily change screen buffer size of Command Prompt in Windows 10 / 8 / 7.

Note: Screen buffer size set using Method 2 and Method 3 will only be temporary and as soon as you close the Command Prompt the changes will be lost.

Method 1: Permanently Change Screen Buffer Size of CMD in Properties

  1. Right-click on the title bar of the Command Prompt window, and then select Properties from the context menu.

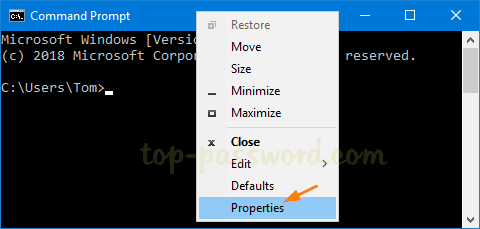
  2. Go to the Layout tab. Under the “Screen Buffer Size” section you can set the desired width and height. If the screen buffer size is greater than the Window Size, then scroll bars will be displayed as required.
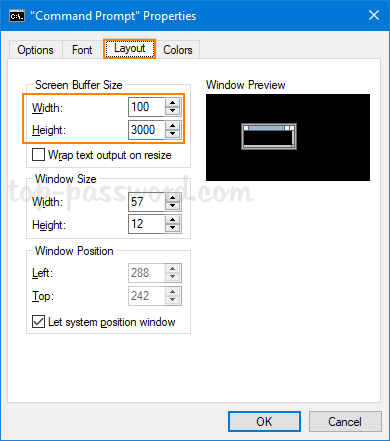
  3. Click OK to apply.

Method 2: Temporarily Change Screen Buffer Size of CMD Using Mode Command

  1. When the Command Prompt window is open, you can temporarily change the screen buffer size by typing this command:
    mode con:cols=Width_Size lines=Height_Size

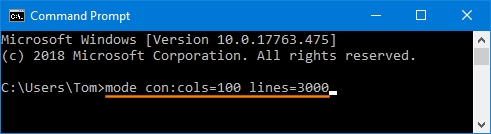
    Substitute “Width_Size” with the value you want for the screen buffer width size and “Height_Size” with the value you want for the screen buffer height size.

  2. As soon as you hit Enter, the current Command Prompt window will resize to apply your new screen buffer size.

Method 3: Temporarily Change Screen Buffer Size of CMD Using Batch / Script

If you need to change screen buffer size from a Windows batch script, just add the following lines:

@echo off
cmd.exe /k "mode con:cols=100 lines=3000"

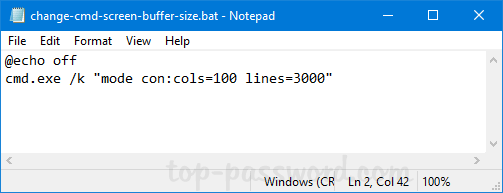
This will change screen buffer width to 100, and set the height size to 3000. You can make any adjustment you like for the width and height value.

How to Enable Quick Removal Policy for USB Drives in Windows 10 / 8 / 7

April 28th, 2019 by Admin

Do you really need to safely eject a USB drive before pulling it out of your computer? Windows has two different policies you can select for each individual USB drive:

  • Quick removal – This will disable write caching on the USB device, and your data will be written to physical drive in real-time. So you will be able to disconnect your USB drive even without using the “Safely Remove Hardware” option.
  • Better performance – This will cache the write operations to optimize performance and your data will be written to physical drive at a later time. Before unplugging your USB drive, you have to click the “Safely Remove Hardware” icon appears in the system tray to tell Windows to write all the cached data to disk.

If you don’t bother with safely removing USB devices before unplugging them, follow this tutorial to enable Quick Removal policy for USB drives in Windows 10 / 8 / 7.

How to Change Removal Policy for USB Drives in Windows

  1. To get started, you need to open the Disk Management tool. If you’re running Windows 10, just hit the Windows key + X together and you can then select “Disk Management” from the menu.

  2. Find your USB drive in the lower section of the Disk Management window, right-click its name and choose Properties from the pop-up menu.

  3. Switch to the Policies tab and you can change the removal policy to Quick removal. Click OK to save your change. Note that This change only applies to this specific USB device.

  4. That’s it! Whenever the activity light on your USB drive is no longer blinking, you can directly remove the device without bothering to click the Safely Remove Hardware notification icon.

Updates: In earlier versions of Windows the default removal policy applied to USB drives was Better Performance. With the release of Windows 10 version 1809, Microsoft has changed its default policy to Quick Removal.

How to Change Local / Domain Admin Password Using Windows PowerShell

April 25th, 2019 by Admin

Need to write a PowerShell script for changing a local account’s password? We’ve covered various ways of resetting Windows password in the past, but this tutorial will teach you how to change the password of either local account or domain account using Windows PowerShell.

How to Change Local / Domain Admin Password Using PowerShell

  1. Open Windows PowerShell as Administrator.

  2. First, you have to convert your new password to encrypted string by running the following command. Be sure to replace P@ssw0rd with the new password you want to set for your account.

    $NewPassword = ConvertTo-SecureString "P@ssw0rd" -AsPlainText -Force

  3. Next, type the following command to change your local account password. Substitute Tom in the command below with the actual user name of the local account that you want to change the password of.
    Set-LocalUser -Name Tom -Password $NewPassword

    If you need to change domain user password, run the following command instead:
    Set-ADAccountPassword Tom -NewPassword $NewPassword –Reset

  4. After completing the above steps, reboot your computer and you can log in to your local / domain account with the new password.

How to Make Windows Clear Pagefile at Shutdown for Added Security

April 24th, 2019 by Admin

Pagefile is a hidden system file used by Windows to swap data back and forth between RAM and physical drive. When your RAM is insufficient to hold every running program, some of the program’s memory (including sensitive data and passwords) will be moved to the pagefile.

Pagefile is well protected while Windows is running, but the data within it persists after a shutdown. A malicious user who has physical access to your PC can extract sensitive data from the pagefile by booting a Live CD. To prevent such potential security risk, you can configure Windows to automatically clear the paging file on every shutdown.

Method 1: Make Windows Clear Pagefile at Shutdown Using GPO

  1. Press the Windows logo key and the R key simultaneously. Once the Run dialog box is opened, type secpol.msc into it and click OK.

  2. Navigate to Security Settings -> Local Policies -> Security Options. On the right pane, double-click on the “Shutdown: Clear virtual memory pagefile” policy.

  3. Select the Enabled radio option, and then click on Apply and then OK.

  4. Restart your computer to make sure the changes take effect.

Method 2: Make Windows Clear Pagefile at Shutdown Using Registry Editor

  1. Open the Registry Editor and browse to the following key:
    HKEY_LOCAL_MACHINE\SYSTEM\CurrentControlSet\Control\Session Manager\Memory Management

    Next, double-click on a 32-bit DWORD value named ClearPageFileAtShutdown in the right pane.

  2. Change the current default value from 0 to 1. Click OK to save the changes.

  3. Restart Windows to apply your changes. Whenever you shut down your PC, Windows will automatically clear the pagefile for added security.

3 Ways to Cancel Print Jobs in Windows 10

April 23rd, 2019 by Admin

Print jobs are stuck in queue and you need to clear the print spooler? How can I prevent further documents from being printed? In this tutorial we’ll show you 3 simple ways to cancel a stuck or accidental print job from the queue, saving you lots of time and paper.

Method 1: Cancel Print Jobs Using Control Panel

Open the “Devices and Printers” applet in the Control Panel. Right-click on the printer that is being used and select “See what’s printing” from the context menu.

This shows a list of print jobs that are in the queue. In order to cancel printing a document, just right-click it and select Cancel.

Method 2: Cancel Print Jobs Using the Settings App

Open the Settings app and click on Devices.

Go to the Printers & scanners tab. On the right side pane, select your printer and then click on the “Open queue” button appeared beneath the printer name.

Now, you can right-click on any print job and then click Cancel to clear it from the print queue.

Method 3: Cancel Print Jobs Using Command Prompt

Open the Command Prompt as Administrator. Run the following commands to delete all .shd and .spl files from C:\WINDOWS\system32\spool\PRINTERS and restart the Print Spooler service.

net stop spooler
del /F /S /Q %systemroot%\System32\spool\PRINTERS\*
net start spooler

The print queue on your Windows 10 PC should now be cleared. Of course, you can create a batch file to execute the above commands, so you can cancel all your print jobs with just a single mouse click!

3 Ways to Clear Clipboard History in Windows 10

April 12th, 2019 by Admin

When you use Ctrl + C to copy text, images or other information in Windows, your data will be stored in the clipboard temporarily so you can then paste it somewhere else. Clipboard works as a temporary repository for data during copy-and-paste operations. In this tutorial we’ll show you different ways to clear clipboard history in Windows 10.

Method 1: Add An Empty Item to Clipboard History

Press the Windows key + R to open the Run box, then type cmd /c “echo off | clip” and hit Enter.

This command will add an empty item to the clipboard history so you then can’t paste anything anywhere. This method could also be used to clear clipboard history in Windows 8, 7, Vista.

Method 2: Clear All Clipboard History Data from Settings App

Open the Settings app and navigate to System -> Clipboard. On the right pane, you can turn off the “Clipboard history” toggle switch to prevent Windows clipboard from saving multiple items. In this case, only the last item you copied into the clipboard will be saved.

When the “Clipboard history” feature is turned on, you can click the “Clear” button to manually clear all history items from the clipboard.

Method 3: Clear Specific Item in Clipboard History

Just press the Windows key + V in any application, a Clipboard panel will appear where you’ll see a list of items (such as text and images) that you have recently copied from different applications.

Click on the three dots icon on the upper-right part of the clipboard item you want to delete. When the pop-up menu appears, you can select Delete to clear it.

That’s it!

Windows 10: Hide or Unhide Folders / Files Using Command Prompt

April 11th, 2019 by Admin

Is there a way to hide important files to prevent accidental deletion? In this tutorial we’ll show you how to hide or unhide folders / files in Windows 10 using Command Prompt.

Hide Folders or Files

When you’re going to hide a specific folder or file, open up the Command Prompt and type:
attrib +h "your_folder_or_file"

This command will assign the “Hidden” attribute to your target folder or file, and make it disappear from the File Explorer view.

If you need to hide all files and subfolders in your target location (for exmaple, D:\demo), run this following command:
attrib +h "d:\demo\*" /s /d

List Hidden Files

If you need to list hidden files and folders while in Command Prompt, use the CD command to change your working directory and then type:

dir /a:h

This will show all hidden folders or files in that location.

Unhide Folders or Files

When you need to unhide a specific folder or file, execute this command:
attrib -s -h "your_hidden_folder_or_file"

In order to unhide all hidden files and subfolders under a location (e.g. D:\demo), type this command:
attrib -s -h "d:\demo\*" /s /d

That’s it! The built-in option to hide folders/files is pretty easy but it’s not secure because anyone can unhide them the easy way. If you need to hide sensitive files from prying eyes, it’s a good idea to use third-party softwares (for instance, Protect My Folders) to hide and lock your folders/files with a password.

How to Fully Shutdown Windows 10 Instead of Hibernating It

April 10th, 2019 by Admin

By default, Windows 10 enables a feature called Fast Startup (Hybrid Shutdown) that can shut down and boot up your PC much faster than Windows 7 or previous versions of Windows. When you shutdown Windows 10, you’re actually performing a partial hibernation.

If you prefer to have your PC completely shut down, you can either turn off Fast Startup feature or use the following methods to fully shutdown Windows 10.

Method 1: Perform a Full Shutdown Using Shift Key

We’ve covered many different ways to shutdown Windows 10 in the past, but you might not realize that Windows 10 is just doing a hybird shutdown by default. If you would like to perform a full shutdown, simply hold down the SHIFT key on your keyboard and then click the “Shut down” option in the Start Menu, or on the sign-in screen.

Method 2: Perform a Full Shutdown Using Command Prompt

Just open an elevated Command Prompt or PowerShell window, type the following command and press Enter:

shutdown /s /f /t 0

This will immediately close any open applications without prompting to save your work, and completely shut down your PC.

Conclusion

The Fast Startup feature can make your computer boot up faster, saving valuable seconds every time you turn on Windows 10. However, if your Windows 10 was installed on a speedy solid-state drive (SSD), Fast Startup don’t actually make any difference and a full shutdown is recommended.